
diff options
Diffstat (limited to 'dcs8000lh.md')
| -rw-r--r-- | dcs8000lh.md | 2043 |
1 files changed, 0 insertions, 2043 deletions
diff --git a/dcs8000lh.md b/dcs8000lh.md deleted file mode 100644 index a680e6b..0000000 --- a/dcs8000lh.md +++ /dev/null @@ -1,2043 +0,0 @@ -# D-Link DCS-8000LH - - - -These are random notes descibing how I changed my D-Link DCS-8000LH -from a cloud camera to a locally managed IP camera, streaming H.264 -MPEG-TS over HTTP and HTTPS. Some of the tools and ideas might work -for other cameras too, given some model specific adaptation. - -Complete defogging requires modifying one of the file systems in the -camera. This implies a slight risk of ending up with a brick. You -have now been warned... - -This is tested and developed on firmware versions v2.01.03 and -v2.02.02 only. The final complete procedure has only been tested with -v2.02.02. It should work fine with v2.01.03 and other versions, in -theory, but could fail like anything untested. Please let me know if -you have an original v2.01.03 firmware update from D-Link, or any -other version for that matter, or know where firmware updates can be -downloaded. - -The v2.02.02 update is available from -https://mydlinkmpfw.auto.mydlink.com/DCS-8000LH/DCS-8000LH_Ax_v2.02.02_3014.bin -at the time of writing. But I assume this link stops working as soon -as there is a newer version available. - - -## Changelog - -* v0.01 (20190515) - initial published version -* v0.02 (20190515) - added RTSP support and information - -## Problem - -My D-Link DCS-8000LH came with firmware version 2.01.03 from factory. -This firmware is locked to the [**mydlink**](https://www.mydlink.com) -app/cloud service. It does not provide a local NIPCA compatible HTTP -API or similar, and it does not stream video over HTTP, HTTPS or RTSP. - -Additionally, there is no way to downgrade the firmware. In fact, -there is no documented way to install any firmware image at all, -except trusting the "mydlink" cloud service to do it for you. - - -## Solution - -#### Primary goals achieved: - -* configuration of network and admin password via Bluetooth LE, without - registering with D-Link or using the [**mydlink**](https://www.mydlink.com) app at all -* streaming MPEG-TS directly from camera over HTTP and HTTPS -* direct RTSP streaming -* NIPCA API configuration over HTTP and HTTPS, supporting settings - like LED, nightmode, etc - - -#### And some extra goodies which came for free - -* Firmware upgrades and downgrades via HTTP -* telnet server with a root account (admin/PIN Code) -* easy access to serial console, using the same root account -* running arbitrary commands on the camera using Bluetooth - -Read on for all the gory details... - - -### Requirements - - * a Linux PC with a Bluetooth controller - * python3 with @IanHarvey's - [**bluepy**](https://ianharvey.github.io/bluepy-doc/index.html) - library - * WiFi network with WPA2-PSK and a known password - * mksquashfs from the squashfs-tools package - * a tftp server or web server accepting file uploads (for backups) - * guts :-) - -Most recent Linux distros will probably do. The bluepy library can be -installed using pip if it is not available as a distro package. Other -types of WiFi networks might work, but has not been tested with the -provided tools. The squashfs-tools are only necessary if you want to -rebuild the "mydlink" alternative file system. I assume you can even -run the tools without installing Linux, by using a Linux "Live" -CD/DVD/USB stick. - -This was developed and tested on Debian Buster. - - - -### Camera configuration using the Bluetooth LE GATT API - -The "mydlink" app uses Bluetooth LE for camera setup, authenticated by -the camera pincode. This repo includes an alternative python script -with a few extra goodies, but needing a better name: -[**dcs8000lh-configure.py**](dcs8000lh-configure.py) - -(Why not an Android app? Because it would take me much more time to -write. Should be fairly easy to do though, for anyone with enough -interest. You can find all the necessary protocol details here and in -the python code. Please let me know if you are interested) - -The script does not support scanning for the simple reason that this -would require root access for not real gain. You have to provide the -**PIN Code** from the camera label -anyway. Reading the **MAC ID** as well is simple enough - - -The **PIN Code** and **MAC** is also printed on the code card that -came with the camera: -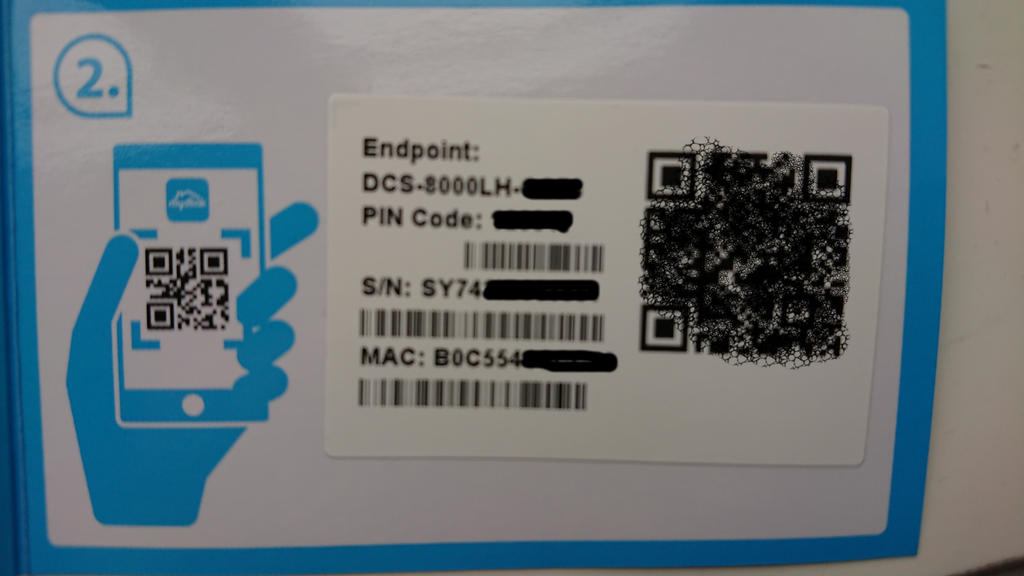 - - -Note that the command line **address** paramenter must be formatted as -**01:23:45:67:89:AB** instead of the **0123456789AB** format printed -on the label. - -Current script help text at the time of writing shows what the script -can do: - -``` -$ ./dcs8000lh-configure.py -h -usage: dcs8000lh-configure.py [-h] [--essid ESSID] [--wifipw WIFIPW] - [--survey] [--netconf] [--sysinfo] - [--command COMMAND] [--telnetd] [--lighttpd] - [--rtsp] [--unsignedfw] [--attrs] [-V] - address pincode - -IPCam Bluetooth configuration tool. - -positional arguments: - address IPCam Bluetooth MAC address (01:23:45:67:89:AB) - pincode IPCam PIN Code (6 digits) - -optional arguments: - -h, --help show this help message and exit - --essid ESSID Connect to this WiFi network - --wifipw WIFIPW Password for ESSID - --survey List WiFi networks seen by the IPCam - --netconf Print current network configuration - --sysinfo Dump system configuration - --command COMMAND Run command on IPCam - --telnetd Start telnet server on IPCam - --lighttpd Start web server on IPCam - --rtsp Enable access to RTSP server on IPCam - --unsignedfw Allow unsigned firmware - --attrs Dump IPCam GATT characteristics - -V, --version show program's version number and exit -``` - - -#### Real session excample after a clean upgrade to firmware v2.02.02, followed by factory reset - -1. Start by making sure the camera can see our WiFi network. This - also verifies that we can connect and authenticate against the - Bluetooth LE IPCam service, without making any changes to any - camera settings: - -``` -$ ./dcs8000lh-configure.py B0:C5:54:AA:BB:CC 123456 --survey -Connecting to B0:C5:54:AA:BB:CC... -Verifying IPCam service -Connected to 'DCS-8000LH-BBCC' -DCS-8000LH-BBCC is scanning for WiFi networks... -{'I': 'AirLink126FD4', 'M': '0', 'C': '11', 'S': '4', 'E': '2', 'P': '47'} -{'I': 'Antiboks', 'M': '0', 'C': '11', 'S': '4', 'E': '2', 'P': '73'} -{'I': 'ASV17', 'M': '0', 'C': '11', 'S': '4', 'E': '2', 'P': '47'} -{'I': 'ASV17-dlink', 'M': '0', 'C': '6', 'S': '4', 'E': '2', 'P': '57'} -{'I': 'DIRECT-33-HP%20ENVY%205000%20series', 'M': '0', 'C': '1', 'S': '4', 'E': '2', 'P': '46'} -{'I': 'fjorde123', 'M': '0', 'C': '1', 'S': '4', 'E': '2', 'P': '55'} -{'I': 'JOJ', 'M': '0', 'C': '11', 'S': '4', 'E': '2', 'P': '48'} -{'I': 'Kjellerbod', 'M': '0', 'C': '11', 'S': '4', 'E': '2', 'P': '75'} -{'I': 'Landskap_24', 'M': '0', 'C': '11', 'S': '4', 'E': '2', 'P': '46'} -{'I': 'mgmt', 'M': '0', 'C': '1', 'S': '4', 'E': '2', 'P': '72'} -{'I': 'Rindedal', 'M': '0', 'C': '11', 'S': '4', 'E': '2', 'P': '68'} -{'I': 'risikovirus', 'M': '0', 'C': '1', 'S': '4', 'E': '2', 'P': '45'} -{'I': 'risikovirus%20WIFI', 'M': '0', 'C': '11', 'S': '4', 'E': '2', 'P': '45'} -{'I': 'Stavik2014', 'M': '0', 'C': '6', 'S': '4', 'E': '2', 'P': '47'} -{'I': 'TomterNett1', 'M': '0', 'C': '6', 'S': '4', 'E': '2', 'P': '44'} -{'I': 'VIF', 'M': '0', 'C': '11', 'S': '4', 'E': '2', 'P': '47'} -Done. -``` - -2. We're going to use the 'Kjellerbod' network, so that looks good. - Select it and give the associated WiFi password to the camera: - -``` -$ ./dcs8000lh-configure.py B0:C5:54:AA:BB:CC 123456 --essid Kjellerbod --wifipw redacted -Connecting to B0:C5:54:AA:BB:CC... -Verifying IPCam service -Connected to 'DCS-8000LH-BBCC' -DCS-8000LH-BBCC is scanning for WiFi networks... -Will configure: M=0;I=Kjellerbod;S=4;E=2;K=redacted -Done. -``` - -3. Verify that the camera connected to the Wifi network and got an - address. If not, go back and try again, making sure you are using - the correct WiFi password: - -``` -$ ./dcs8000lh-configure.py B0:C5:54:AA:BB:CC 123456 --netconf -Connecting to B0:C5:54:AA:BB:CC... -Verifying IPCam service -Connected to 'DCS-8000LH-BBCC' -wifi link is Up -wifi config: {'M': '0', 'I': 'Kjellerbod', 'S': '4', 'E': '2'} -ip config: {'I': '192.168.2.37', 'N': '255.255.255.0', 'G': '192.168.2.1', 'D': '148.122.16.253'} -Done. -``` - - -**WARNING**: You must make a backup of your device at this point if -you haven't done so already. See the [**Backup**](#Backup) section -below. I only skipped it in this example because I already had a -complete backup of my camera. - - - -4. We need HTTP NIPCA API for the remaining tasks, so temporarily - start lighttpd on the camera: - -``` -$ ./dcs8000lh-configure.py B0:C5:54:AA:BB:CC 123456 --lighttpd -Connecting to B0:C5:54:AA:BB:CC... -Verifying IPCam service -Connected to 'DCS-8000LH-BBCC' -Attempting to run '[ $(tdb get HTTPServer Enable_byte) -eq 1 ] || tdb set HTTPServer Enable_byte=1' on DCS-8000LH-BBCC by abusing the 'set admin password' request -Attempting to run '/etc/rc.d/init.d/extra_lighttpd.sh start' on DCS-8000LH-BBCC by abusing the 'set admin password' request -Done. -``` - -Note that this implicitly changes a couple of settings which are -stored in the ["db"](#Partitions) NVRAM partition, and therefore will persist until -the next factory reset: - * extra_lighttpd.sh will exit without doing anything unless - **HTTPServer Enable** is set - * the admin password is set both because we're abusing that BLE - request, and because we need it for the HTTP API access. The - script only supports setting the password to the **PIN Code**. - -*This password restriction is because I'm lazy - there is nothing in -the camera or protocol preventing the password from being set to -something else. But the script would then need the new password as -an additional input parameter for most commands* - - -5. Disable firmware signature verification. Only firmwares signed by - D-Link are accepted by default. This feature can be disabled by - changing a variable in the ["db"](#Partitions) NVRAM partition: - -``` -$ ./dcs8000lh-configure.py B0:C5:54:AA:BB:CC 123456 --unsignedfw -Connecting to B0:C5:54:AA:BB:CC... -Verifying IPCam service -Connected to 'DCS-8000LH-BBCC' -Attempting to run 'tdb set SecureFW _TrustLevel_byte=0' on DCS-8000LH-BBCC by abusing the 'set admin password' request -Done. -``` - -6. The final step is the dangerous one. It replaces the file system - on the [**userdata**](#Partitions) partition with our home cooked one. The D-Link - firmware uses this partition exclusively for the "mydlink" cloud - tools, which we don't need. The rest of the system is not touched - by our firmware update. The camera will therefore run exactly the - same kernel and rootfs as before the update, whatever version they - were. I.e., the firmware version does not change - only the - "mydlink" version. - - -**NOTE**; You need to [build](#BuildFirmware) a **fw.tar** firmware -update image first. - -``` -$ curl --http1.0 -u admin:123456 --form upload=@fw.tar http://192.168.2.37/config/firmwareupgrade.cgi -upgrade=ok -``` - -See the section on [error handling](#Errors) if the upgrade request -returned anything else. - -The camera will reboot automatically at this point, assuming the -update was successful. From now both with telnetd and lighttpd -running, and with external access to the RTSP server. All services -will use the same **admin:PIN Code** account for authentication. - -So we now have access to direct [streaming](#Streaming) over HTTP, -HTTPS and RTSP without ever having been in contact with the -[**mydlink**](https://www.mydlink.com) service! - - - -### <a name="Streaming"></a>Streaming video locally - -Which was the whole point of all this... We can now stream directly -from the camera using for example: - - -#### HTTP or HTTPS -``` -vlc https://192.168.2.37/video/mpegts.cgi -vlc https://192.168.2.37/video/flv.cgi -``` - -Authenticate using the **admin** user with **PIN Code** as password - -AFAICS, this camera does not support MJPEG encoding. But you can -always use ffmpeg to transcode the H.264 anyway. Looking closer at a -stream sample: - - -``` -$ curl --insecure -u admin:123456 https://192.168.2.37/video/mpegts.cgi>/tmp/stream - % Total % Received % Xferd Average Speed Time Time Time Current - Dload Upload Total Spent Left Speed - 0 93.1G 0 438k 0 0 92872 0 12d 11h 0:00:04 12d 11h 92853^C - -$ mediainfo /tmp/stream -General -ID : 1 (0x1) -Complete name : /tmp/stream -Format : MPEG-TS -File size : 500 KiB -Duration : 5 s 433 ms -Overall bit rate mode : Variable -Overall bit rate : 752 kb/s - -Video -ID : 257 (0x101) -Menu ID : 1 (0x1) -Format : AVC -Format/Info : Advanced Video Codec -Format profile : High@L4 -Format settings, CABAC : Yes -Format settings, ReFrames : 1 frame -Format settings, GOP : M=1, N=30 -Codec ID : 27 -Duration : 5 s 450 ms -Width : 1 280 pixels -Height : 720 pixels -Display aspect ratio : 16:9 -Frame rate mode : Variable -Color space : YUV -Chroma subsampling : 4:2:0 -Bit depth : 8 bits -Scan type : Progressive - -Audio -ID : 256 (0x100) -Menu ID : 1 (0x1) -Format : AAC -Format/Info : Advanced Audio Codec -Format version : Version 2 -Format profile : LC -Muxing mode : ADTS -Codec ID : 15 -Duration : 3 s 456 ms -Bit rate mode : Variable -Channel(s) : 1 channel -Channel positions : Front: C -Sampling rate : 16.0 kHz -Frame rate : 15.625 FPS (1024 spf) -Compression mode : Lossy -``` - - -#### RTSP - -Direct RTSP access is also supported, using the same **admin** user. - -The RTSP URLs are configurable, so the proper way to use RTSP is to -first check the URL of the wanted profile using the NIPCA API: - -``` -$ curl -u admin:123456 --insecure 'https://192.168.2.37/config/rtspurl.cgi?profileid=1' -profileid=1 -urlentry=live/profile.0 -video_codec=H264 -audio_codec=OPUS -``` - -and then connect to this RTSP URL: - -``` -$ vlc rtsp://192.168.2.37/live/profile.0 -``` - -Note that persistent RTSP access can be enabled with original -unmodified D-Link firmware, using the Bluetooth **--rtsp** option. -This modifies the necessary settings. The **rtspd** service is -already started by default in the original firmware. - -So there is no need to mess with the firmware at all if all you want -is RTSP. - - -#### <a name="Errors"></a>Errors during firmware update via HTTP - -The **firmwareupgrade.cgi** script running in the camera isn't much -smarter than the rest of the system, so there are a few important -things keep in mind. These are found by trial-and-error: - - * HTTP/1.1 might not work - the firmwareupgrade.cgi script does not support **100 Continue** AFAICS - * The firmware update image should be provided as a **file** input field from a form - * The field name must be **upload**. - -Use the exact curl command provided above, replacing only the PIN -Code, IP address and firmware filename. This should work. Anything -else might not. - -The camera must be manually rebooted by removing power or pressing -reset if the firmware upgrade fails for any reason. The -**firmwareupgrade.cgi** script stops most processes, inluding the -Bluetooth handler, and fails to restart them on errors. - -There will be no permanent harm if the upload fails. But note that -you have to repeat the **--lighttpd** step after rebooting the camera, -before you can retry. It does not start automatically until we've -installed our modified "mydlink" alternative. - -The contents of the fw.tar file must obviously be a valid, encrypted, -firmware update intended for the specified hardware. It must also be -signed. But the signing key can be unknown to the camera provided the -previous **--unsignedfw** request above was successful. - -The [**Makefile**](Makefile) provided here shows how to [build](#BuildFirmware) a valid firmware -update, but for the DCS-8000LH only! It does not support any other -model. It will create a new throwaway signing key if it canæt find a -real one, and include the associated public key in the archive in case -you want to verify the signature manually. - -Note that the encryption key might be model specific. I do not know -this as I have no other model to look at. Please let me know if you -have any information on this topic. - -The encryption key is part ot the [**pib**](#Partitions) partition, and can be -read from a shell using -``` -pibinfo PriKey -``` - -Or you can simply look at your partition backup. The key is stored as -a plain text *RSA PRIVATE KEY* PEM blob, so it is easy to spot. This -repo includes a copy of my [key](keys/DCS-8000LH-PriKey.pem) as I see -no point in attempting to keep a well known shared key like this one -"secret" - - -### <a name="Backup"></a>Backup - -Create a backup of everything *before* you mess up. Restoring will be -hard anyway, so don't rely on that. But you can forget about -restoring at all unless you have a backup, so make it anyway. - -Note that the [**pib**](#Partitions) partition contains data which are -specific to **your** camera, and cannot be restored from any other -source! This includes - * model number - * hardware revision - * mac address - * feature bits - * private keys, pincode and passwords - -Well, OK, we can restore most of the [**pib**](#Partitions) using information from -the [camera label](https://www.mork.no/~bjorn/dcs8000lh/dcs8000lh-label.jpg), but -it's better to avoid having to do that... - -A backup is also useful for analyzing the file systems offline. - -Making a backup without networking is inconvenient, so setup -networking first. In theory, you could dump the flash to the serial -console. But this would be very time consuming and tiresome. - -The D-Link firmware provides a selection of network file transfer -tools. Pick anyone you like: - * tftp - * wget - * curl - * ...and probably more - -I've been using tftp for my backups because it is simple. You'll -obviously need a tftp server for this. Google for instructions on -setting that up. You could alternatively set up a web server and use -wget or curl to post the files there, but this is more complx to set -up IMHO. - -Here is one example of how to enable temporary telnet access and -copying all camera flash partitions to a tftp server: - -``` -$ ./dcs8000lh-configure.py B0:C5:54:AA:BB:CC 123456 --telnetd -Connecting to B0:C5:54:AA:BB:CC... -Verifying IPCam service -Connected to 'DCS-8000LH-BBCC' -Adding the 'admin' user as an alias for 'root' -Attempting to run 'grep -Eq ^admin: /etc/passwd||echo admin:x:0:0::/:/bin/sh >>/etc/passwd' on DCS-8000LH-BBCC by abusing the 'set admin password' request -Setting the 'admin' user password to '123456' -Attempting to run 'grep -Eq ^admin:x: /etc/passwd&&echo admin:123456|chpasswd' on DCS-8000LH-BBCC by abusing the 'set admin password' request -Starting telnetd -Attempting to run 'pidof telnetd||telnetd' on DCS-8000LH-BBCC by abusing the 'set admin password' request - - -Attempting to run '[ $(tdb get HTTPServer Enable_byte) -eq 1 ] || tdb set HTTPServer Enable_byte=1' on DCS-8000LH-BBCC by abusing the 'set admin password' request -Attempting to run '/etc/rc.d/init.d/extra_lighttpd.sh start' on DCS-8000LH-BBCC by abusing the 'set admin password' request -Done. - - -$ telnet 192.168.2.37 -Trying 192.168.2.37... -Connected to 192.168.2.37. -Escape character is '^]'. -localhost login: admin -Password: - - -BusyBox v1.22.1 (2019-02-14 17:06:35 CST) built-in shell (ash) -Enter 'help' for a list of built-in commands. - - -# for i in 0 1 2 3 4 5 6 7 8; do tftp -l /dev/mtd${i}ro -r mtd$i -p 192.168.2.1; done` -``` - -Change 192.168.2.37 to the address of your camera and 192.168.2.1 to -the address of your tftp server. Note that most tftp servers require -existing and writable destination files. Refer to your tftp server docs -for details. - - - -## All the gory details - - -### Restoring original D-Link firmware - -The D-Link firmware, including the mydlink tools in the -[**userdata**](#Partitions) partition, can be restored by doing a -manual firmware upgrade providing a firmware update from D-Link. Real -example, going back to v2.02.02: - -``` -$ curl --http1.0 -u admin:123456 --form upload=@DCS-8000LH_Ax_v2.02.02_3014.bin http://192.168.2.37/config/firmwareupgrade.cgi -curl: (52) Empty reply from server -``` - -I don't know why I got that **Empty reply** warning instead of the -expected **upgrade=ok**, but update went fine so I guess it can safely -be ignored. Might be a side effect of rewriting the root file system, -which the firmwareupgrade.cgi script is running from. - - -### Serial console - -Entirely optional. The defogging procedure does not require console -access, but it can be very useful when debugging problems related to -network configuration etc. - -There is a 4 hole female header with 2 mm spacing in the bottom of the -camera. This header is easily accessible without opening the case at -all. But you will need to remove the bottom label to find it: -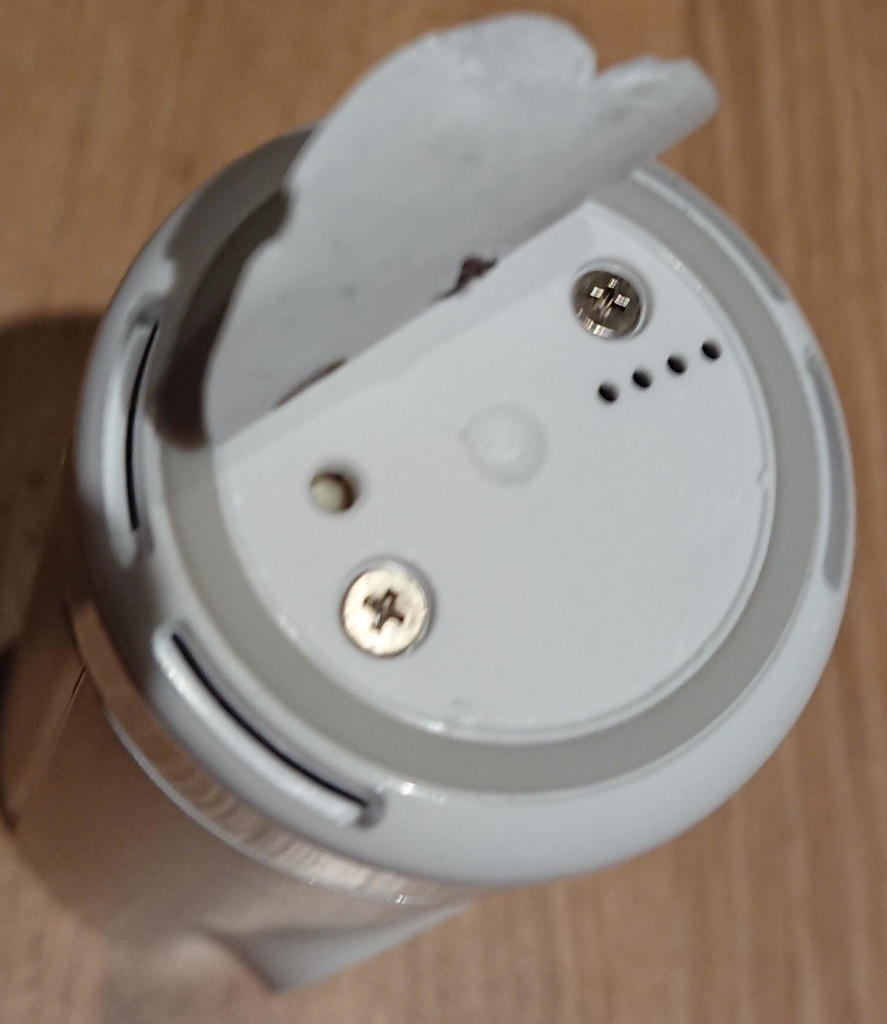 - -Take a picure of the lable or save the information somewhere else -first, in case you make the it unreadable in the process. - -Mate with a 3 (or 4) pin male 2 mm connector, or use sufficiently -solid wires. The pins need to be 6-10 mm long. The pins will mess up the QR code, but the rest of the label can be left intact if you're careful: -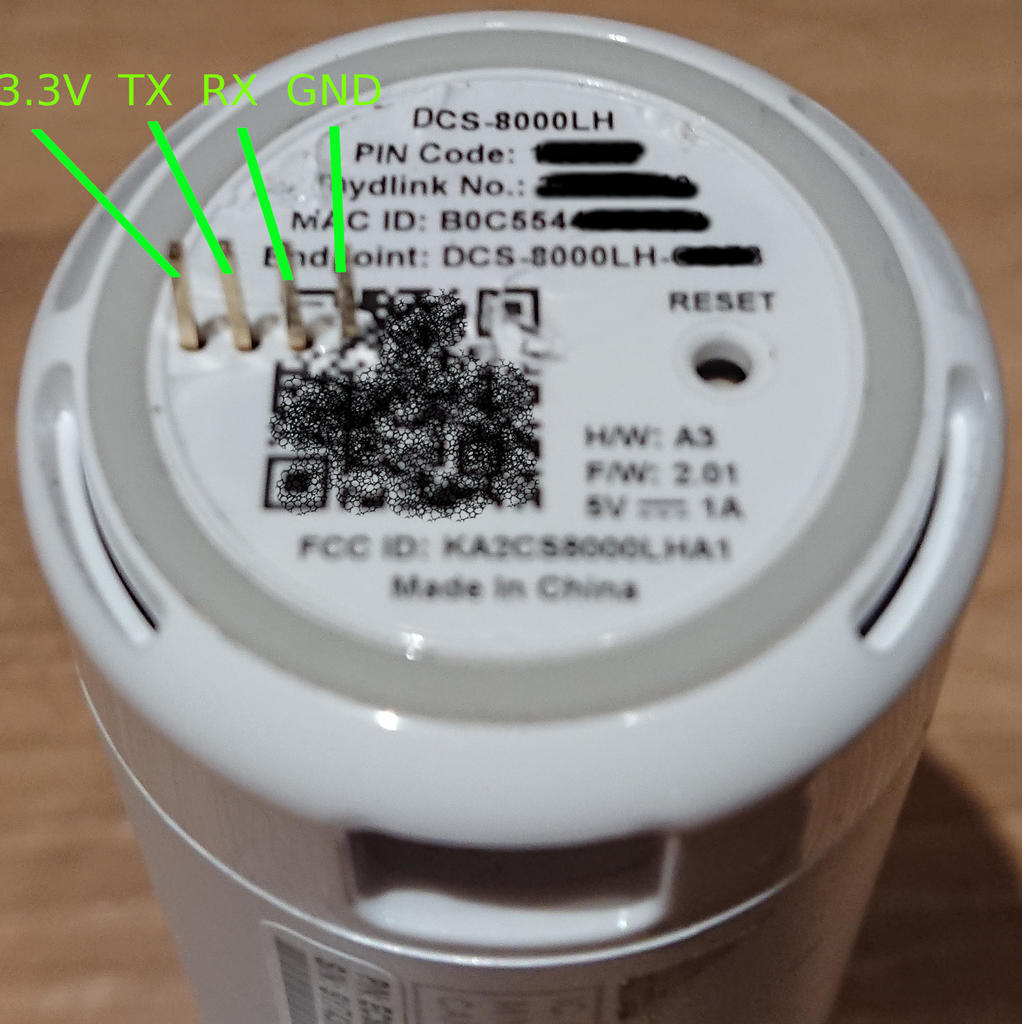 - -The pinout seen from egde to center of camera is: - - -| 1 | 2 | 3 | 4 | -|------|----|----|-----| -| 3.3V | TX | RX | GND | - -and the serial port parameters are 57600 8N1. - - -You obviously need a 3.3V TTL adapter for this, Look at for example -at the generic OpenWrt console instructions if you need guidance. -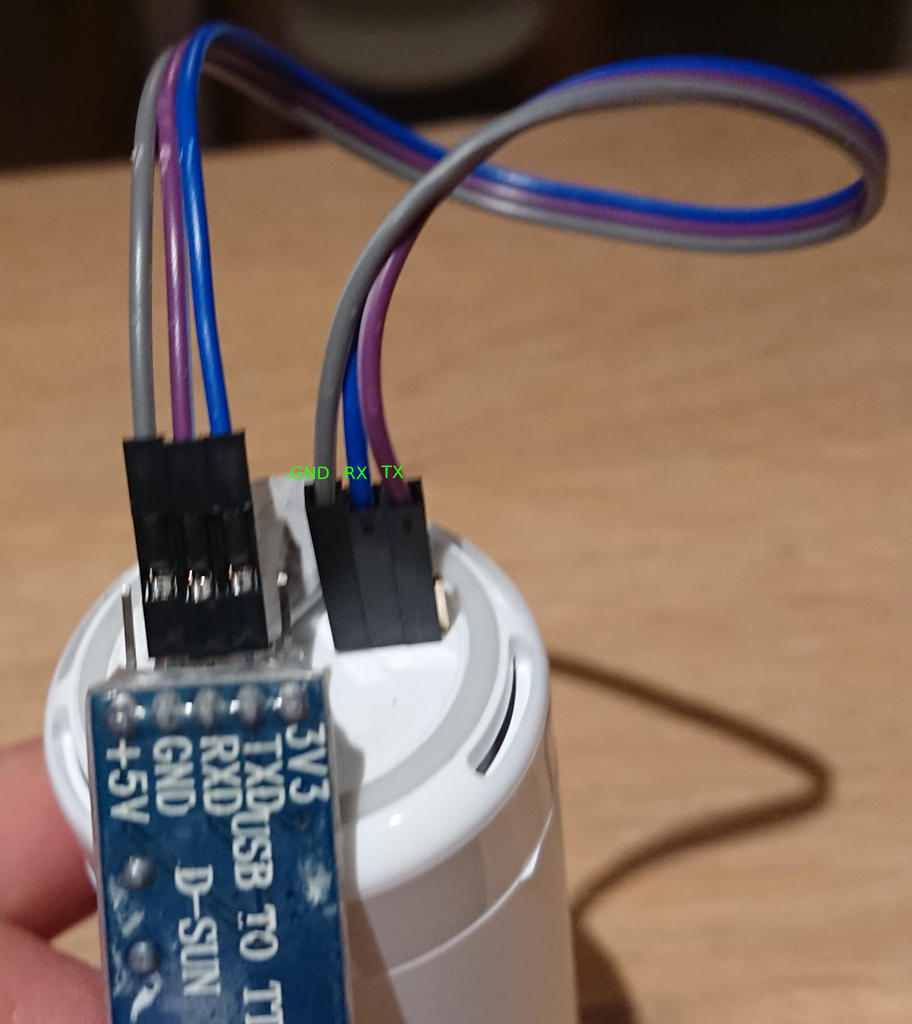 - - -Do not connect the 3.3V pin. All USB TTL adapters are powered by the -USB bus. - - - -### Opening the case - -Remove the top and bottom parts of the sylinder. I assume the two -remaning halves of the sylinder are simple held together by clips, but -I did not verify this after discovering the easily accessible console -header. - -The top lid is clipped on: -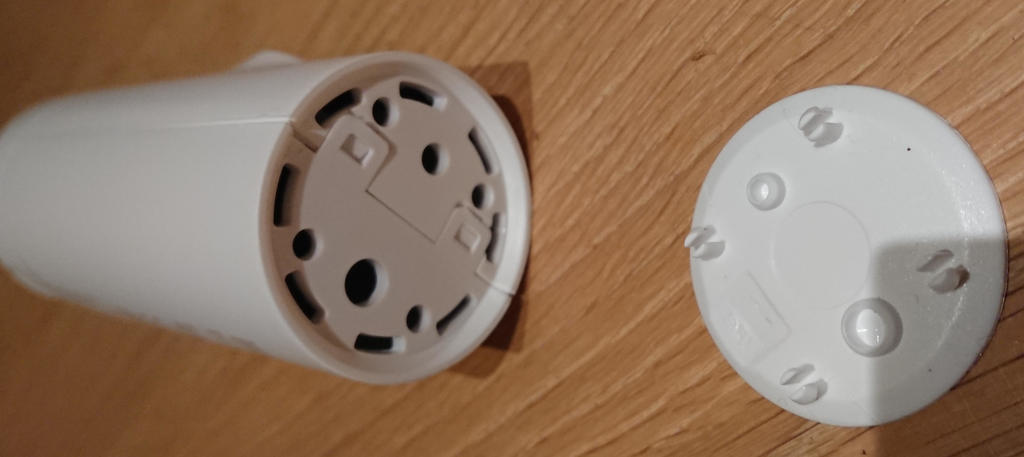 - -The bottom cover is held in place by two screws under the label: - - - -Removing the bottom cover reveals the reset button and the console header: -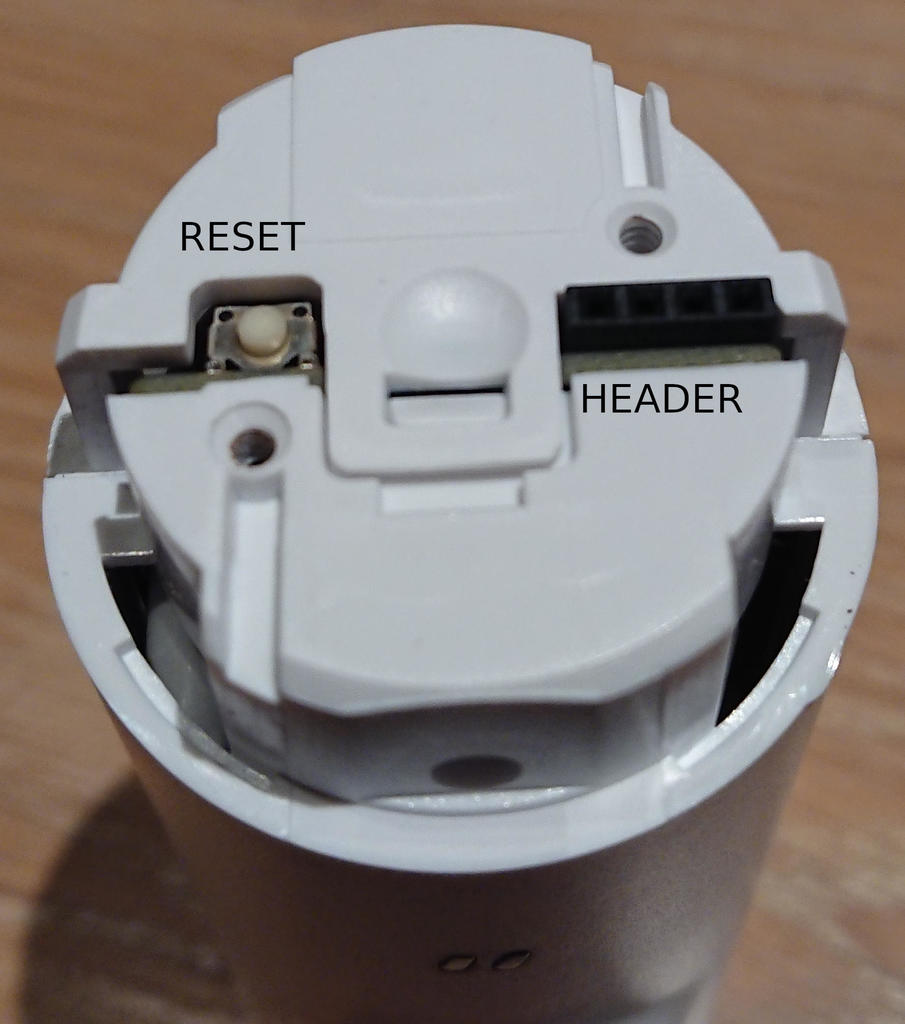 - - -### U-Boot - -My DCS-8000LH came with this boot loader: - -`U-Boot 2014.01-rc2-V1.1 (Jun 06 2018 - 03:44:37)` - -But it is patched/configured to require a password for access to the -U-Boot prompt. Fortunately, D-Link makes the password readily -available in their GPL package :-) It is found in the file -`DCS-8000LH-GPL/configs/gpl_defconfig`: - -`ALPHA_FEATURES_UBOOT_LOGIN_PASSWORD="alpha168"` - -Enter **alpha168** password when you see - -`Press ESC to abort autoboot in 3 seconds` - -and you'll get a `rlxboot#` prompt, with access to these U-Boot commands : - -``` -rlxboot# ? -? - alias for 'help' -base - print or set address offset -bootm - boot application image from memory -bootp - boot image via network using BOOTP/TFTP protocol -cmp - memory compare -coninfo - print console devices and information -cp - memory copy -crc32 - checksum calculation -echo - echo args to console -editenv - edit environment variable -efuse - efuse readall | read addr -env - environment handling commands -fephy - fephy read/write -go - start application at address 'addr' -help - print command description/usage -imxtract- extract a part of a multi-image -loadb - load binary file over serial line (kermit mode) -loadx - load binary file over serial line (xmodem mode) -loady - load binary file over serial line (ymodem mode) -loop - infinite loop on address range -md - memory display -mm - memory modify (auto-incrementing address) -mw - memory write (fill) -nm - memory modify (constant address) -ping - send ICMP ECHO_REQUEST to network host -printenv- print environment variables -reset - Perform RESET of the CPU -setenv - set environment variables -setethaddr- set eth address -setipaddr- set ip address -sf - SPI flash sub-system -source - run script from memory -tftpboot- boot image via network using TFTP protocol -tftpput - TFTP put command, for uploading files to a server -tftpsrv - act as a TFTP server and boot the first received file -update - update image -version - print monitor, compiler and linker version -``` - -Using the boot loader for image manipulation will be hard though, -since the camera has no ethernet, USB or removable flash and the boot -loader has no WiFi driver. It is probably possible to load an image -over serial, but I don't have the patience for that... - -The environment is fixed and pretty clean: -``` -rlxboot# printenv -=3 -addmisc=setenv bootargs ${bootargs}console=ttyS0,${baudrate}panic=1 -baudrate=57600 -bootaddr=(0xBC000000 + 0x1e0000) -bootargs=console=ttyS1,57600 root=/dev/mtdblock8 rts_hconf.hconf_mtd_idx=0 mtdparts=m25p80:256k(boot),128k(pib),1024k(userdata),128k(db),128k(log),128k(dbbackup),128k(logbackup),3072k(kernel),11264k(rootfs) -bootcmd=bootm 0xbc1e0000 -bootfile=/vmlinux.img -ethact=r8168#0 -ethaddr=00:00:00:00:00:00 -load=tftp 80500000 ${u-boot} -loadaddr=0x82000000 -stderr=serial -stdin=serial -stdout=serial - -Environment size: 533/131068 bytes -``` - -So we can get ourselves a root shell: - - -``` -rlxboot# setenv bootargs ${bootargs} init=/bin/sh -rlxboot# ${bootcmd} -``` - -Nothing is mounted or started since /sbin/init is skipped altogether -in this case. Not even /sys and /proc. We can emulate a semi-normal -system by running - -`/etc/rc.d/rcS` - -as the first command. And then run for example - -`telnetd -l /bin/sh` - -to enable temporary passwordless telnet into the camera instead of/in -addition to the serial console. This is futile unless you have -networking of course. I will not go into details on how to do that -from the shell. Use the much simpler Bluetooth procedure described -above. Or the "mydlink" app if you prefer. - - -### OEM boot log - -``` -U-Boot 2014.01-rc2-V1.1 (Jun 06 2018 - 03:44:37) - -rx5281 prid=0xdc02 -DRAM: 64 MiB @ 800 MHz -Skipping flash_init -Flash: 0 Bytes -flash status is 0, 2, 0 -SF: Detected W25Q128FV with page size 256 Bytes, erase size 64 KiB, total 16 MiB -Using default environment - -In: serial -Out: serial -Err: serial -Net: Realtek PCIe GBE Family Controller mcfg = 0024 -no hw config header -new_ethaddr = 00:00:00:00:00:00 -r8168#0 -no hw config header -Press ESC to abort autoboot in 3 seconds## Booting kernel from Legacy Image at bc1e0000 ... -get header OKimage_get_kernel check hcrc -image_get_kernel print contents - Image Name: linux_3.10 - Created: 2018-06-05 19:44:27 UTC - Image Type: MIPS Linux Kernel Image (uncompressed) - Data Size: 1662157 Bytes = 1.6 MiB - Load Address: 804d4960 - Entry Point: 804d4960 - Verifying Checksum ... OK - Loading Kernel Image ... OK - -Starting kernel ... - -Linux version 3.10.27 (jenkins@DMdssdFW1) (gcc version 4.8.5 20150209 (prerelease) (Realtek RSDK-4.8.5p1 Build 2278) ) #1 PREEMPT Wed Jun 6 03:36:32 CST 2018 -prom cpufreq = 500000000 -prom memsize = 67108864 -hw_ver: 0x1, hw_rev: 0x2, isp_ver: 0x0 -bootconsole [early0] enabled -CPU revision is: 0000dc02 -Determined physical RAM map: - memory: 04000000 @ 00000000 (usable) -Reserved contiguous memory at 0x4f3000 -Zone ranges: - Normal [mem 0x00000000-0x03ffffff] -Movable zone start for each node -Early memory node ranges - node 0: [mem 0x00000000-0x03ffffff] -icache: 32kB/32B, dcache: 16kB/32B, scache: 0kB/0B -Built 1 zonelists in Zone order, mobility grouping on. Total pages: 16256 -Kernel command line: console=ttyS1,57600 root=/dev/mtdblock8 rts_hconf.hconf_mtd_idx=0 mtdparts=m25p80:256k(boot),128k(pib),1024k(userdata),128k(db),128k(log),128k(dbbackup),128k(logbackup),3072k(kernel),11264k(rootfs) -PID hash table entries: 256 (order: -2, 1024 bytes) -Dentry cache hash table entries: 8192 (order: 3, 32768 bytes) -Inode-cache hash table entries: 4096 (order: 2, 16384 bytes) -Memory: 48600k/65536k available (3844k kernel code, 16936k reserved, 888k data, 192k init, 0k highmem) -SLUB: HWalign=32, Order=0-3, MinObjects=0, CPUs=1, Nodes=1 -Preemptible hierarchical RCU implementation. -NR_IRQS:49 -Calibrating delay loop... 498.89 BogoMIPS (lpj=2494464) -pid_max: default: 32768 minimum: 301 -Mount-cache hash table entries: 512 -pinctrl core: initialized pinctrl subsystem -regulator-dummy: no parameters -NET: Registered protocol family 16 -rtsxb2 registered with IRQs -INFO: initializing USB host ... -INFO: initializing spi host ...0 -spi platform id is 0 -INFO: initializing I2C master ... -INFO: initializing DMA controller ... -INFO: initializing SD controller ... -INFO: initializing snd device ... -snd resvd mem size : 1048576 -INFO: initializing pinctrl device ... -pinctrl_platform pinctrl_platform: rtspc registered with IRQs -INFO: initializing ethernet devices ... -INFO: initializing dwc_otg devices ... -INFO: initializing USB phy ... -INFO: initializing ISP device ... -isp resvd mem addr : 0x005f3000, size : 0xa00000 -ISP camera platform devices added -INFO: initializing watchdog controller ... -INFO: initializing PWM controller ... -INFO: initializing crypto device ... -INFO: initializing pmu device ... -bio: create slab <bio-0> at 0 -rts_dmac rts_dmac: DesignWare DMA Controller, 1 channels -INFO: realtek DMA engine inited -SCSI subsystem initialized -spic-platform spic-platform.0: master is unqueued, this is deprecated -INFO:allocate spi master 0, 0 -usbcore: registered new interface driver usbfs -usbcore: registered new interface driver hub -usbcore: registered new device driver usb -usbphy-platform usbphy-platform: Initialized Realtek IPCam USB Phy module -Linux video capture interface: v2.00 -Advanced Linux Sound Architecture Driver Initialized. -Bluetooth: Core ver 2.16 -NET: Registered protocol family 31 -Bluetooth: HCI device and connection manager initialized -Bluetooth: HCI socket layer initialized -Bluetooth: L2CAP socket layer initialized -Bluetooth: SCO socket layer initialized -NET: Registered protocol family 2 -TCP established hash table entries: 512 (order: 0, 4096 bytes) -TCP bind hash table entries: 512 (order: -1, 2048 bytes) -TCP: Hash tables configured (established 512 bind 512) -TCP: reno registered -UDP hash table entries: 256 (order: 0, 4096 bytes) -UDP-Lite hash table entries: 256 (order: 0, 4096 bytes) -NET: Registered protocol family 1 -RPC: Registered named UNIX socket transport module. -RPC: Registered udp transport module. -RPC: Registered tcp transport module. -RPC: Registered tcp NFSv4.1 backchannel transport module. -squashfs: version 4.0 (2009/01/31) Phillip Lougher -NFS: Registering the id_resolver key type -Key type id_resolver registered -Key type id_legacy registered -jffs2: version 2.2. (NAND) © 2001-2006 Red Hat, Inc. -msgmni has been set to 94 -NET: Registered protocol family 38 -Block layer SCSI generic (bsg) driver version 0.4 loaded (major 253) -io scheduler noop registered -io scheduler deadline registered -io scheduler cfq registered (default) -Serial: 8250/16550 driver, 3 ports, IRQ sharing disabled -serial8250: ttyS0 at MMIO 0x18810000 (irq = 6) is a 16550A -console [ttyS1] enabled, bootconsole disabled -console [ttyS1] enabled, bootconsole disabled -serial8250: ttyS1 at MMIO 0x18810100 (irq = 6) is a 16550A -serial8250: ttyS2 at MMIO 0x18810200 (irq = 6) is a 16550A -dbg_iomem initialized! -m25p80 spi0.0: unrecognized id mx25l12845e -m25p80 spi0.0: found w25q128fv, expected m25p80 -m25p80 spi0.0: w25q128fv (16384 Kbytes) -9 cmdlinepart partitions found on MTD device m25p80 -Creating 9 MTD partitions on "m25p80": -0x000000000000-0x000000040000 : "boot" -0x000000040000-0x000000060000 : "pib" -0x000000060000-0x000000160000 : "userdata" -0x000000160000-0x000000180000 : "db" -0x000000180000-0x0000001a0000 : "log" -0x0000001a0000-0x0000001c0000 : "dbbackup" -0x0000001c0000-0x0000001e0000 : "logbackup" -0x0000001e0000-0x0000004e0000 : "kernel" -0x0000004e0000-0x000000fe0000 : "rootfs" -invalid hconf_mtd_idx! -hconf init failed -rtl8168 Gigabit Ethernet driver 8.038.00-NAPI loaded -rtl8168 rtl8168 (unregistered net_device): Get invalid MAC address from flash! -eth%d: 0xb8400000, 00:00:00:00:00:00, IRQ 10 -PPP generic driver version 2.4.2 -PPP MPPE Compression module registered -NET: Registered protocol family 24 -ehci_hcd: USB 2.0 'Enhanced' Host Controller (EHCI) Driver -ehci-rts: ehci-rts platform driver -ehci-platform ehci-platform: EHCI Host Controller -ehci-platform ehci-platform: new USB bus registered, assigned bus number 1 -ehci-platform ehci-platform: irq 11, io mem 0x18100000 -ehci-platform ehci-platform: USB 2.0 started, EHCI 1.00 -usb usb1: New USB device found, idVendor=1d6b, idProduct=0002 -usb usb1: New USB device strings: Mfr=3, Product=2, SerialNumber=1 -usb usb1: Product: EHCI Host Controller -usb usb1: Manufacturer: Linux 3.10.27 ehci_hcd -usb usb1: SerialNumber: ehci-platform -hub 1-0:1.0: USB hub found -hub 1-0:1.0: 1 port detected -ohci_hcd: USB 1.1 'Open' Host Controller (OHCI) Driver -ohci-platform ohci-platform: Generic Platform OHCI Controller -ohci-platform ohci-platform: new USB bus registered, assigned bus number 2 -ohci-platform ohci-platform: irq 11, io mem 0x18180000 -usb usb2: New USB device found, idVendor=1d6b, idProduct=0001 -usb usb2: New USB device strings: Mfr=3, Product=2, SerialNumber=1 -usb usb2: Product: Generic Platform OHCI Controller -usb usb2: Manufacturer: Linux 3.10.27 ohci_hcd -usb usb2: SerialNumber: ohci-platform -hub 2-0:1.0: USB hub found -hub 2-0:1.0: 1 port detected -dwc_otg: version 3.10b 20-MAY-2013 -Core Release: 3.10a -Setting default values for core params -WARN::dwc_otg_set_param_dev_tx_fifo_size:6354: Value is larger then power-on FIFO size - -WARN::dwc_otg_set_param_dev_tx_fifo_size:6354: Value is larger then power-on FIFO size - -Using Buffer DMA mode -Periodic Transfer Interrupt Enhancement - disabled -Multiprocessor Interrupt Enhancement - disabled -OTG VER PARAM: 0, OTG VER FLAG: 0 -Shared Tx FIFO mode -usbcore: registered new interface driver usb-storage -g_mass_storage gadget: Mass Storage Function, version: 2009/09/11 -g_mass_storage gadget: Number of LUNs=1 - lun0: LUN: removable file: (no medium) -g_mass_storage gadget: Mass Storage Gadget, version: 2009/09/11 -g_mass_storage gadget: g_mass_storage ready -usb device pull 1 -i2c /dev entries driver -Unable to read RTP_REG_CHIP_VERSION reg -rtp_mfd 0-0030: pre_init() failed: -140 -rtp_mfd: probe of 0-0030 failed with error -140 -Stopped watchdog timer -timer margin: 8 sec -nf_conntrack version 0.5.0 (759 buckets, 3036 max) -ip_tables: (C) 2000-2006 Netfilter Core Team -TCP: cubic registered -NET: Registered protocol family 17 -Bluetooth: RFCOMM TTY layer initialized -Bluetooth: RFCOMM socket layer initialized -usb 1-1: new high-speed USB device number 2 using ehci-platform -Bluetooth: RFCOMM ver 1.11 -Bluetooth: BNEP (Ethernet Emulation) ver 1.3 -Bluetooth: BNEP filters: protocol multicast -Bluetooth: BNEP socket layer initialized -Key type dns_resolver registered -ALSA device list: - No soundcards found. -VFS: Mounted root (squashfs filesystem) readonly on device 31:8. -Freeing unused kernel memory: 192K (804b0000 - 804e0000) -usb 1-1: New USB device found, idVendor=0bda, idProduct=b720 -usb 1-1: New USB device strings: Mfr=1, Product=2, SerialNumber=3 -usb 1-1: Product: 802.11n WLAN Adapter -usb 1-1: Manufacturer: Realtek -usb 1-1: SerialNumber: 00e04c000001 -init started: BusyBox v1.22.1 (2018-06-06 03:10:44 CST) -starting pid 54, tty '': '/etc/rc.d/rcS start' -mount: mounting none on /proc/bus/usb failed: No such file or directory -rm: can't remove '/dev/mtd9': No such file or directory -mknod: /dev/console: File exists -soc-audio soc-audio.0: ASoC: machine RLX_INTERN_CARD should use snd_soc_register_card() -soc-audio soc-audio.0: rlx-codec-digital <-> pcm-platform mapping ok -soc-audio soc-audio.0: rlx-codec-analog <-> pcm-platform mapping ok -pinctrl_platform pinctrl_platform: request() failed for pin 0 -pinctrl_platform pinctrl_platform: pin-0 (pinctrl-rts:0) status -16 -request GPIO failed -sd-platform: probe of rts3901-sdhc failed with error -16 -rtscam:rtscam_soc_probe -rtscam:rtscam_hx280_probe -rtscam:hx280enc:HW at base <0x18060000> with ID <0x48314810> -rtscam:rtscam_jpgenc_probe -rtscam:rtstream_init -rtscam:begin to load fw from isp.fw -rtscam:Load firmware size : 131072. -rtscam:Found ISP 1.006 device -rtscam:video device <rts3901-isp> registered -rtscam:rts3901-isp initialized -Setup db... ok. -Startting dbd... Password for 'root' changed -ok. -set the date to default: -Wed Jun 6 00:00:00 UTC 2018 -No SD Device Path Exists. -rc.sysinit start ok. -============ normal mode =============== -dbd(181) is already running. -Startting tz_dst... ok. -setsystz ok -Startting watchDog... ok. -Startting avcd... -mic vol = 80 -avcd ok. -starting create_certificate...get server.pem... ok. -Startting dbus-daemon... ok. -Startting bluetoothd... sendCmd : 0 -Open /tmp/ap_list fail: No such file or directory -main[283] Fail to get channel of Kjellerbod network -configure : - Wireless : essid: Kjellerbod, encryp_method: AES, auth_method: WPA2PSK - Network : dhcp_enable: 1, hostname: DCS-8000LH -Open /proc/sys/net/ipv6/conf/wlan0/autoconf fail: No such file or directory -killall: rtspd: no process killed -killall: udhcpc: no process killed -killall: wifiAutoReconnect: no process killed -sendCmd : 0 -sendCmd : 0 -/bin/sh: dibbler-client: not found -killall: orthrus: no process killed -killall: orthrusipv6: no process killed -killall: pppd: no process killed -killall: zcip: no process killed -wlan1 MAC [b2:c5:54:4c:cc:73] -23186 wpa_supplicant -B -c /tmp/wpa_supplicant.conf -i wlan0 -P /tmp/wpa_supplicant.pid -rfkill: Cannot open RFKILL control device -ioctl[SIOCSIWAP]: Operation not permitted -udhcpc (v1.22.1) started -/sbin/udhcpc.sh: line 1: /etc/rc.d/init.d/zcip.sh: not found -Sending discover... -Sending discover... -Sending select for 192.168.2.37... -Lease of 192.168.2.37 obtained, lease time 432000 -ifdown: interface wlan1 not configured -cat: can't open '/tmp/wifi-led.pid': No such file or directory -sh: you need to specify whom to kill -deleting routers -route: ioctl 0x890c failed: No such process -adding dns 148.122.16.253 -adding dns 148.122.164.253 -start network services, ... -Startting mDNSResponder... ok. -Starting rtspd... ok. -Startting ntpd... disabled. -Startting firewall...ok. -/etc/rc.d/rcS: /etc/rc.d/rcS.d/S24network.sh: line 5: /etc/rc.d/init.d/network_services_ipv6.sh: not found -Starting Apple Darwin Multicast DNS / DNS Service Discovery daemon: mdnsd. -Jun 6 02:00:32 mDNSResponder: mDNSResponder (Engineering Build) (Jun 6 2018 03:55:36) starting -Jun 6 02:00:32 mDNSResponder: mDNS_AddDNSServer: Lock not held! mDNS_busy (0) mDNS_reentrancy (0) -Jun 6 02:00:32 mDNSResponder: mDNS_AddDNSServer: Lock not held! mDNS_busy (0) mDNS_reentrancy (0) -Jun 6 02:00:32 mDNSResponder: WARNING: mdnsd continuing as root because user "nobody" does not exist -Startting ntpd... disabled. -Startting db_analysis... ok. -Startting firewall...ok. -rtspd(1011 878) is already running. -Startting myDlinkEvent... ok. -2018-06-06 02:00:37 | INFO | tcp_listen | 176| listening 127.0.0.1:7000 -2018-06-06 02:00:37 | INFO | http_listen | 40| waiting new connections ... -rc.local start ok. -starting pid 1157, tty '': '/bin/busybox getty -L ttyS1 57600 vt100' - -localhost login: May 6 22:34:35 mDNSResponder: mDNS_Execute: mDNSPlatformRawTime went backwards by 438780374 ticks; setting correction factor to -1542198966 -May 6 22:34:37 mDNSResponderPosix: mDNSCoreReceive: mDNSPlatformRawTime went backwards by 438777274 ticks; setting correction factor to 1206127822 -``` - - -### <a name="Partitions"></a>Partitions - -The D-Link DCS-8000LH partitions are: -``` -# cat /proc/mtd -dev: size erasesize name -mtd0: 00040000 00010000 "boot" -mtd1: 00020000 00010000 "pib" -mtd2: 00100000 00010000 "userdata" -mtd3: 00020000 00010000 "db" -mtd4: 00020000 00010000 "log" -mtd5: 00020000 00010000 "dbbackup" -mtd6: 00020000 00010000 "logbackup" -mtd7: 00300000 00010000 "kernel" -mtd8: 00b00000 00010000 "rootfs" -``` -Or as seen by the driver with start and end addresses: - -``` -9 cmdlinepart partitions found on MTD device m25p80 -Creating 9 MTD partitions on "m25p80": -0x000000000000-0x000000040000 : "boot" -0x000000040000-0x000000060000 : "pib" -0x000000060000-0x000000160000 : "userdata" -0x000000160000-0x000000180000 : "db" -0x000000180000-0x0000001a0000 : "log" -0x0000001a0000-0x0000001c0000 : "dbbackup" -0x0000001c0000-0x0000001e0000 : "logbackup" -0x0000001e0000-0x0000004e0000 : "kernel" -0x0000004e0000-0x000000fe0000 : "rootfs" -``` - -Partition usage: - - | number | name | start | end | size | fstype | contents | - | ------ | ----------- | -------- | -------- | -------- | -------- | --------------- | - | 0 | "boot" | 0x000000 | 0x040000 | 0x40000 | boot | U-Boot | - | 1 | "pib" | 0x040000 | 0x060000 | 0x20000 | raw | device info | - | 2 | "userdata" | 0x060000 | 0x160000 | 0x100000 | squashfs | mydlink (/opt) | - | 3 | "db" | 0x160000 | 0x180000 | 0x20000 | tar.gz | non-volatile data | - | 4 | "log" | 0x180000 | 0x1a0000 | 0x20000 | raw? | empty | - | 5 | "dbbackup" | 0x1a0000 | 0x1c0000 | 0x20000 | tar.gz | copy of "db" | - | 6 | "logbackup" | 0x1c0000 | 0x1e0000 | 0x20000 | raw? | empty | - | 7 | "kernel" | 0x1e0000 | 0x4e0000 | 0x300000 | uImage | Linux 3.10 | - | 8 | "rootfs" | 0x4e0000 | 0xfe0000 | 0xb00000 | squashfs | rootfs (/) | - - -The D-Link firmware updates I have looked at will replace the -"userdata", "kernel" and "rootfs" partitions, but leave other -partitions unchanged. I imagine that the "boot" partition might be -upgraded too if deemed necessary by D-Link. But it was not touched -when going from 2.01.03 to 2.02.02. - -The "log" and "logbackup" appear to be currently unused. But I am -reluctant trusting this, given their names. I guess they could be -cleaned and overwritten anytime. They are too small to be very useful -anyway. You can't put any writable file system om them with only two -erase blocks. - - -### Backing up dynamic data - -This is not necessary for system operation as any non-volatile data is -saved in the [**db**](#Partitions) partition anyway. But it can still be useful to -have a copy of the system state for offline studying, so I also like -to save a working copy of /tmp: -``` -tar zcvf /tmp/tmp.tgz /tmp/ -tftp -l /tmp/tmp.tgz -r tmp.tgz -p 192.168.2.1 -``` - - -### Why can we run the NIPCA webserver before we modify the firmware? - -D-Link left all the webserver parts in the firmware, including all the -NIPCA CGI tools. The only change they made was disabling the startup -script. - -The webserver can be enabled and started manually from the shell by -running: - -``` -tdb set HTTPServer Enable_byte=1 -/etc/rc.d/init.d/extra_lighttpd.sh start -``` - -This is precisely what our Bluetooth tool does when it is called with -the **--lighttpd** option. - -The `HTTPServer Enable_byte` is persistent, so setting is only -necessary once. Unless you do a factory reset. - - -### What's the problem with the RTSP server in the unmodified firmware? - -The original D-Link firmware is already running **rtspd**, but it is only -listening on the loopback address 127.0.0.1. It is probably intended -as a backend server for the **mydlink** services. - -We can make rtspd listen on all addresses by clearing the **RTPServer -RejectExtIP** setting. Both rtspd and the firewall need a restart for -this to have an effect. Enabling **RTPServer Authenticate** is -probably a good idea when doing this, to prevent the camera from -streaming to anyone who can connect. - -``` -tdb set RTPServer RejectExtIP_byte=0 -tdb set RTPServer Authenticate_byte=1 -/etc/rc.d/init.d/firewall.sh reload -/etc/rc.d/init.d/rtspd.sh restart -``` - -These settings are persistent as usual, so they only need to be -modified after factory resets. Changing the settings and then -rebooting the camera will therefore enable remote RTSP access, since -both services are running by default in the D-Link firmware. - - -### The "userdata" file system - -The [**userdata**](#Partitions) you backed up as **mtd2** contains a xz compressed -squasfs file system, with most of the mydlink cloud tools. The file -system can be unpacked on a Linux system using unsquashfs: -``` -$ unsquashfs mtd2 -Parallel unsquashfs: Using 4 processors -15 inodes (22 blocks) to write - -[=============================================================================================================================================================================================================|] 22/22 100% - -created 12 files -created 1 directories -created 3 symlinks -created 0 devices -created 0 fifos -$ ls -la squashfs-root/ -total 1156 -drwxr-xr-x 2 bjorn bjorn 340 Feb 14 10:58 . -drwxrwxrwt 41 root root 2280 May 13 15:13 .. --rwxr-xr-x 1 bjorn bjorn 13184 Feb 14 10:58 ca-refresh --rwxr-xr-x 1 bjorn bjorn 273692 Feb 14 10:58 cda -lrwxrwxrwx 1 bjorn bjorn 9 May 13 15:13 cert -> /tmp/cert --rwxr-xr-x 1 bjorn bjorn 5991 Feb 14 10:58 client-ca.crt.pem -lrwxrwxrwx 1 bjorn bjorn 7 May 13 15:13 config -> /tmp/db --rwxr-xr-x 1 bjorn bjorn 436428 Feb 14 10:58 da_adaptor --rwxr-xr-x 1 bjorn bjorn 4 Feb 14 10:58 dcp_version --rwxr-xr-x 1 bjorn bjorn 814 Feb 14 10:58 device.cfg -lrwxrwxrwx 1 bjorn bjorn 17 May 13 15:13 lib -> /var/libevent/lib --rwxr-xr-x 1 bjorn bjorn 5 Feb 14 10:58 m2m --rwxr-xr-x 1 bjorn bjorn 6220 Feb 14 10:58 mydlink_watchdog.sh --rwxr-xr-x 1 bjorn bjorn 1034 Feb 14 10:58 opt.local --rwxr-xr-x 1 bjorn bjorn 171828 Feb 14 10:58 sa --rwxr-xr-x 1 bjorn bjorn 242028 Feb 14 10:58 strmsvr --rwxr-xr-x 1 bjorn bjorn 10 Feb 14 10:58 version -``` - -The primary entry point here is the **opt.local** init-script. This -is also the only required file. The **version** file is read by the -Bluetooth API, and reported as the mydlink version, which makes it -useful for verifying a modified camera. Our alternate -[**userdata**](#Partitions) file system contains only these two -files. But one could imagine including a number of other useful tools, -like tcpdump, a ssh server etc. - -It is also possible to keep all the D-Link files, if that's -wanted. The original **opt.local** script can be modified to leave -mydlink support running while still starting other features. We could -even add our own non-volatile setting to choose one or the other, or -both, and making it a configuration thing. Fantasy is the only -limiting factor. - -Repacking the files into a camera compatible squashfs file system: -``` -mksquashfs squashfs-root mtd2.new -all-root -comp xz -``` - -Note that **xz** compression is required. No other compression is -supported AFAIK. - -There are simpler ways to write the new file system to the camera than -creating a firmware update package, if you just want to test it. One -example: - -``` -tftp -r mtd2.new -l /tmp/mtd2.new -g 192.168.2.1 -cat /tmp/mtd2.new >/dev/mtdblock2 -``` - -But DON'T do that unless you both have a backup and know what you are -doing... - -You should reboot the camera after doing this, unless you make sure -you stop any process running from the previous /opt system and remount -it properly. - - -### <a name="NIPCA"></a>Using NIPCA to manage the camera - -The local web server provides a direct camera management API, but not -a web GUI application. All API requests require authentication. We -have added a single admin user, using the pincode from the camera -label as passord. More users can be adding if necessary, even by -using the API itself. - -Read the NIPCA reference spec for usage, or look at the script names -under **/var/www** in the [**rootfs**](#Partitions) and simply try -them out. Most API endpoints return a list of current settings. Some -of the settings can be set by GET requests by providing the new values -as URL parameters. - -A few NIPCA references of different age: - * http://gurau-audibert.hd.free.fr/josdblog/wp-content/uploads/2013/09/CGI_2121.pdf - * https://docplayer.net/33354138-Network-ip-camera-application-programming-interface-nipca.html - * ftp://ftp.dlink.net.pl/dcs/dcs-2132L/documentation/DCS-2132L_NIPCA_support table_1-9-5_20131211.pdf - * https://www.airlivecam.eu/data/IP%20Camera%20Open%20API.doc - -Google for more. Be aware that a most of these settings depend on the -hardware. There is obviously no point in trying to manage an SD card -slot of the DCS-8000LH... - -A few of examples, using curl to read and set configuration variables: -``` -$ curl -u admin:123456 http://192.168.2.37/common/info.cgi -model=DCS-8000LH -product=Wireless Internet Camera -brand=D-Link -version=2.02 -build=02 -hw_version=A -nipca=1.9.7 -name=DCS-8000LH -location= -macaddr=B0:C5:54:AA:BB:CC -ipaddr=192.168.2.37 -netmask=255.255.255.0 -gateway=192.168.2.1 -wireless=yes -inputs=0 -outputs=0 -speaker=no -videoout=no -pir=no -icr=yes -ir=yes -mic=yes -led=no -td=no -playing_music=no -whitelightled=no - -$ curl -u admin:123456 'http://192.168.2.37/config/datetime.cgi' -method=1 -timeserver=ntp1.dlink.com -timezone=1 -utcdate=2019-05-09 -utctime=13:25:14 -date=2019-05-09 -time=15:25:14 -dstenable=yes -dstauto=yes -offset=01:00 -starttime=3.2.0/02:00:00 -stoptime=11.1.0/02:00:00 - -$ curl -u admin:123456 http://192.168.2.37/config/led.cgi?led=off -led=off -``` - -Most camera settings can be controlled using this API and e.g curl for -the command line. There are also packages implementing API clients, -like for example this nodejs one: https://www.npmjs.com/package/nipca - - - -### Bluetooth LE GATT API - -The Bluetooth service is in a "locked" mode by default. This is -controlled by the "Ble Mode" persistent setting stored in the **db** -partition. If true ("1"), then most of the Bluetooth commands are -rejected. But changing the setting manually will not help much, since -the system automatically enter lock mode 180 seconds after the last -Bluetooth client disconnected. - -The challenge -> response unlock method described below is much more -useful. - - -#### Converting the PIN Code to a Bluetooth unlock key - -Most Bluetooth commands are rejected when locked. Access to the full -Bluetooth API can be unlocked by using the PIN Code printed on the -camera label. This code is not sent directly over the air -though. Instead it is combined with a random challenge. - -Both the random challenge and the matching key are generated by the -application `sbin/gen_bt_config` on the camera side. The key is -calculated by taking the first 16 bytes of the base64 encoded md5 -digest of - - * model string + '-' four last mac digits (or Bluetooth device name?) - * PIN Code - * challenge. - -Note that this application depends on bluetooth libraries, which are -not in /lib. So we have to set LD\_LIBRARY\_PATH to run it manually: - -``` -# LD_LIBRARY_PATH=/var/bluetooth/lib sbin/gen_bt_config update_key_only -In main:182: modelStr = 'DCS-8000LH' -In main:183: mac = 'b0:c5:54:ab:cd:ef' -In update_ble_key:87: key data = 'DCS-8000LH-CDEF012345b2gaescrbldchnik' -``` - -I've slightly obfuscated my data here - the pincode in the above case -is `012345`, and the dynamically generated challenge is -`b2gaescrbldchnik`. The generated challenge and key are stored in -`/tmp/db/db.xml` and can be read directly from there: -``` -# grep Key /tmp/db/db.xml |tail -2 -<ChallengeKey type="3" content="b2gaescrbldchnik" /> -<Key type="5" content="jrtY6nONQ5rV+2Ph" /> -``` - -Or you can read them using the same tools the Bluetooth system uses: -``` -# tdb get Ble ChallengeKey_ss -b2gaescrbldchnik -# mdb get ble_key -jrtY6nONQ5rV+2Ph -``` - -Yes, the D-Link code does actually use tdb for the first one and mdb -for the second. I have absolutely no idea why,... It is possible to -read the key using tdb too: - -``` -# tdb get Ble Key_ss -jrtY6nONQ5rV+2Ph -``` - -Generating the same key by hand on a Linux system is simple: - -``` -$ echo -n 'DCS-8000LH-CDEF012345b2gaescrbldchnik' | md5sum | xxd -r -p | base64 | cut -c-16 -jrtY6nONQ5rV+2Ph -``` - -#### Characteristic UUIDs - -D-Link is using the GATT BlueZ example plugin, patching it to add -their camera specific endpoints. This means that we can find all the -API "documentation" in the -`DCS-8000LH-GPL/package/bluez_utils/feature-patch/5.28/customized-mydlink.patch` -file in the GPL archive. - -This defines a number of 16bit UUIDs with mostly nonsense names: -``` -+#define IPCAM_UUID 0xD001 -+#define A000_UUID 0xA000 -+#define A001_UUID 0xA001 -+#define A100_UUID 0xA100 -+#define A101_UUID 0xA101 -+#define A102_UUID 0xA102 -+#define A103_UUID 0xA103 -+#define A104_UUID 0xA104 -+#define A200_UUID 0xA200 -+#define A201_UUID 0xA201 -+#define A300_UUID 0xA300 -+#define A301_UUID 0xA301 -+#define A302_UUID 0xA302 -+#define A303_UUID 0xA303 -+#define A304_UUID 0xA304 -``` - - -`IPCAM_UUID` is registered as the `GATT_PRIM_SVC_UUID`, which means -that it shows up as a primary GATT service we can look for when -looking for a supported camera. - -The rest of the UUIDs are characteristics of this primary service. The -API is based on reading or writing these characteristics. - - -#### Data formatting - -Both input and output parameters are sent as ascii strings using -key=value pairs joined by `;`, with an exception for the nested KV -pairs in the WiFi survey results. All keys are single upper case -characters. Key names are somewhat reused, so the exact meaning depend -on the characteristic. - -Values are either integers, including boolean 0/1, or some set of -ascii text. - -Three real examples, read from 0xA001, 0xA200 and 0xA104: -``` -M=1;C=b2gaescrbldchnik -N=DCS-8000LH;P=1;T=1557349762;Z=CET-1CEST,M3.5.0,M10.5.0/3;F=2.01.03;H=A1;M=B0C554ABCDEF;V=3.0.0-b71 -I=192.168.2.37;N=255.255.255.0;G=192.168.2.1;D=148.122.16.253 -``` - -#### Listing characteristics - - -The **gattool** Linux command line tool is useful for exploring -Bluetooth LE devices. You can look for primary services and list -associated characteristics of a service: -``` -[B0:C5:54:AA:BB:CC][LE]> primary -attr handle: 0x0001, end grp handle: 0x0008 uuid: 00001800-0000-1000-8000-00805f9b34fb -attr handle: 0x0010, end grp handle: 0x0010 uuid: 00001801-0000-1000-8000-00805f9b34fb -attr handle: 0x0011, end grp handle: 0x002e uuid: 0000d001-0000-1000-8000-00805f9b34fb -[B0:C5:54:AA:BB:CC][LE]> characteristics 0x0011 -handle: 0x0012, char properties: 0x12, char value handle: 0x0013, uuid: 0000a000-0000-1000-8000-00805f9b34fb -handle: 0x0015, char properties: 0x0a, char value handle: 0x0016, uuid: 0000a001-0000-1000-8000-00805f9b34fb -handle: 0x0017, char properties: 0x02, char value handle: 0x0018, uuid: 0000a100-0000-1000-8000-00805f9b34fb -handle: 0x0019, char properties: 0x0a, char value handle: 0x001a, uuid: 0000a101-0000-1000-8000-00805f9b34fb -handle: 0x001b, char properties: 0x08, char value handle: 0x001c, uuid: 0000a102-0000-1000-8000-00805f9b34fb -handle: 0x001d, char properties: 0x02, char value handle: 0x001e, uuid: 0000a103-0000-1000-8000-00805f9b34fb -handle: 0x001f, char properties: 0x02, char value handle: 0x0020, uuid: 0000a104-0000-1000-8000-00805f9b34fb -handle: 0x0021, char properties: 0x0a, char value handle: 0x0022, uuid: 0000a200-0000-1000-8000-00805f9b34fb -handle: 0x0023, char properties: 0x08, char value handle: 0x0024, uuid: 0000a201-0000-1000-8000-00805f9b34fb -handle: 0x0025, char properties: 0x0a, char value handle: 0x0026, uuid: 0000a300-0000-1000-8000-00805f9b34fb -handle: 0x0027, char properties: 0x02, char value handle: 0x0028, uuid: 0000a301-0000-1000-8000-00805f9b34fb -handle: 0x0029, char properties: 0x08, char value handle: 0x002a, uuid: 0000a302-0000-1000-8000-00805f9b34fb -handle: 0x002b, char properties: 0x08, char value handle: 0x002c, uuid: 0000a303-0000-1000-8000-00805f9b34fb -handle: 0x002d, char properties: 0x02, char value handle: 0x002e, uuid: 0000a304-0000-1000-8000-00805f9b34fb -``` - -It is also possible to read and write characteristics using this tool, -but this can be a bit cumbersome unless you are fluent in ASCII coding -;-) - - - -#### The IPCam characteristics - -Guessed meanings of each characteristic, based on the source code and -some trial and error. Not necessarily how D-Link would describe them: - - -| UUID | op | description | format | keys | -| ---- | ------ | --------------- | --------------------------------------- | --------------------------------------------------------------------------------------------------------------- | -| A000 | read | last status | C=%d;A=%d;R=%d | C: uuid, A: mode, R: state | -| A000 | notify | last status | C=%d;A=%d;R=%d | C: uuid, A: mode, R: state | -| A001 | read | challenge | M=%d;C=%s | M: opmode, C: challenge | -| A001 | write | auth | M=%d;K=%s | M: opmode, K: key | -| A100 | read | wifi survey | N=%d;P=%d;... | | -| A101 | read | wifi config | M=%s;I=%s;S=%s;E=%s | M: opmode, I: essid, S: 4 , E: 2 | -| A101 | write | wifi config | M=%s;I=%s;S=%s;E=%s;K=%s | M: opmode, I: essid, S: 4 , E: 2, K: password | -| A102 | write | wifi connect | C=%d | C: connect (0/1) | -| A103 | read | wifi status | S=%d | S: wifi link status (0,1,?) | -| A104 | read | ip config | I=%s;N=%s;G=%s;D=%s | I: address, N: netmask, G: gateway, D: DNS-server | -| A200 | read | system info | N=%s;P=%d;T=%d;Z=%s;F=%s;H=%s;M=%s;V=%s | N: devicename, P: haspin (0/1), T: time (unix epoch), Z: timezone, F: fwver, H: hwver, M: macaddr, V:mydlinkver | -| A200 | write | name and time | N=%s;T=%d;Z=%s | N: devicename, T: time (unix epoch), Z: timezone | -| A201 | write | admin password | P=%s;N=%s | P: current password, N: new password | -| A300 | read | reg state | G=%d | G: registration state (0/1) | -| A300 | write | reg state | G=%d | G: registration state (0/1) | -| A301 | read | provisioning | N=%s;T=%s;U=%s | N: username, T: footprint, U: portal | -| A302 | write | restart mydlink | C=%d | C: restart (0/1) | -| A303 | write | register | S=%s;M=%s | S: , M: (written to /tmp/mydlink/reg_info, and then kill -USR1 `pidof da_adaptor`) | -| A304 | read | register | S=%d;E=%d | S: , E: (cat /tmp/mydlink/reg_st) | - - -The UUIDs from 0xA300 to 0xA304 are all related to the mydlink cloud -service, and therefore not of much use to us. I haven't bothered -trying to figure out exactly how they are used. - -We could in theory use the 0xA303 request which simply calls -**/opt/opt.local restart**. But with the gaping 0xA201 hole, -allowing **any** command, there isn't much need for this one... - -A few more details on the more complex characteristics: - - -##### A000 - -The only characteristic sent as notifications. But it can also be -read directly for syncronous operations. - -The value is the state to the last Bluetooth action: - - "C=%d;A=%d;R=%d", last_action_status.uuid, last_action_status.mode, last_action_status.state - - -##### A100 - -The wifi survey scan results are split in 128 byte "pages", where each -page starts with the total number of pages and the current page -number. The characteristic value must be read as many times as the -given total. - -For example, reading 3 pages: -``` -[B0:C5:54:AA:BB:CC][LE]> char-read-hnd 0x0018 -Characteristic value/descriptor: 4e 3d 33 3b 50 3d 31 3b 4c 3d 49 3d 41 6e 74 69 62 6f 6b 73 2c 4d 3d 30 2c 43 3d 36 2c 53 3d 34 2c 45 3d 32 2c 50 3d 36 32 26 4c 3d 49 3d 41 53 56 31 37 2c 4d 3d 30 2c 43 3d 31 31 2c 53 3d 34 2c 45 3d 32 2c 50 3d 34 36 26 4c 3d 49 3d 41 53 56 31 37 2d 64 6c 69 6e 6b 2c 4d 3d 30 2c 43 3d 36 2c 53 3d 34 2c 45 3d 32 2c 50 3d 36 38 26 4c 3d 49 3d 66 6a 6f 72 64 65 31 32 33 2c 4d 3d 30 -[B0:C5:54:AA:BB:CC][LE]> char-read-hnd 0x0018 -Characteristic value/descriptor: 4e 3d 33 3b 50 3d 32 3b 2c 43 3d 31 2c 53 3d 34 2c 45 3d 32 2c 50 3d 35 38 26 4c 3d 49 3d 4a 4f 4a 2c 4d 3d 30 2c 43 3d 31 31 2c 53 3d 34 2c 45 3d 32 2c 50 3d 34 37 26 4c 3d 49 3d 4b 6a 65 6c 6c 65 72 62 6f 64 2c 4d 3d 30 2c 43 3d 36 2c 53 3d 34 2c 45 3d 32 2c 50 3d 36 32 26 4c 3d 49 3d 6d 67 6d 74 2c 4d 3d 30 2c 43 3d 31 2c 53 3d 34 2c 45 3d 32 2c 50 3d 37 34 26 4c 3d 49 3d 52 69 -[B0:C5:54:AA:BB:CC][LE]> char-read-hnd 0x0018 -Characteristic value/descriptor: 4e 3d 33 3b 50 3d 33 3b 6e 64 65 64 61 6c 2c 4d 3d 30 2c 43 3d 31 31 2c 53 3d 34 2c 45 3d 32 2c 50 3d 36 32 -``` - -These strings are decoded as: -``` -N=3;P=1;L=I=Antiboks,M=0,C=6,S=4,E=2,P=62&L=I=ASV17,M=0,C=11,S=4,E=2,P=46&L=I=ASV17-dlink,M=0,C=6,S=4,E=2,P=68&L=I=fjorde123,M=0 -N=3;P=2;,C=1,S=4,E=2,P=58&L=I=JOJ,M=0,C=11,S=4,E=2,P=47&L=I=Kjellerbod,M=0,C=6,S=4,E=2,P=62&L=I=mgmt,M=0,C=1,S=4,E=2,P=74&L=I=Ri -N=3;P=3;ndedal,M=0,C=11,S=4,E=2,P=62 -``` - -Which, when joined after removing the N/P paging info, becomes:: -``` -L=I=Antiboks,M=0,C=6,S=4,E=2,P=62&L=I=ASV17,M=0,C=11,S=4,E=2,P=46&L=I=ASV17-dlink,M=0,C=6,S=4,E=2,P=68&L=I=fjorde123,M=0,C=1,S=4,E=2,P=58&L=I=JOJ,M=0,C=11,S=4,E=2,P=47&L=I=Kjellerbod,M=0,C=6,S=4,E=2,P=62&L=I=mgmt,M=0,C=1,S=4,E=2,P=74&L=I=Rindedal,M=0,C=11,S=4,E=2,P=62 -``` - -And after splitting this on & we get the final result: -``` -L=I=Antiboks,M=0,C=6,S=4,E=2,P=62 -L=I=ASV17,M=0,C=11,S=4,E=2,P=46 -L=I=ASV17-dlink,M=0,C=6,S=4,E=2,P=68 -L=I=fjorde123,M=0,C=1,S=4,E=2,P=58 -L=I=JOJ,M=0,C=11,S=4,E=2,P=47 -L=I=Kjellerbod,M=0,C=6,S=4,E=2,P=62 -L=I=mgmt,M=0,C=1,S=4,E=2,P=74 -L=I=Rindedal,M=0,C=11,S=4,E=2,P=62 -``` - -So each L entry is made up of the same set of keys: - - * I: essid - * M: opmode? or authalg? (always 0 in the sample) - * C: channel (2.4 GHz only) - * S: key_mgmt/auth_alg/proto? - * E: key_mgmt/auth_alg/proto? - * P: relative signal. Higher is better. dBm + 100? - -Still need to figure out the mapping of the M,S,E keys to -wpa_supplicant config settings. I assume they represent enums. But we -can simply treat them as opaque values since we only use the survey -data to help setup WiFi anyway. We copy these to the setup request, -and do not need to know what they mean. - - -FWIW, my example setting `M=0;I=Kjellerbod;S=4;E=2` -is mapped to this wpa_supplicant configuration: -``` -# cat /tmp/wpa_supplicant.conf -ctrl_interface=/var/run/wpa_supplicant -device_type=4-0050F204-3 -model_name=DCS-8000LH -manufacturer=D-Link -os_version=01020300 -config_methods=push_button virtual_push_button -eapol_version=1 -network={ - scan_ssid=1 - ssid="Kjellerbod" - key_mgmt=WPA-PSK - auth_alg=OPEN - proto=RSN - psk="redeacted" -} -``` - -##### A201 - -This write request allows setting an admin password, used for example -by the webserver. It takes the old and new passwords as unencoded -input, verifies that the old password matches, and then change the -admin password to the provided new one. - -The initial password is empty, which prevents webserver -authentication. Simply provide an empty string for the old password in -the first request: **P=;N=newpassword** - -But this request is much more useful in other ways.... The new passord -(N_str) is processed like this (after slight compression of the -interesting code lines): - -```C - snprintf(cmd, sizeof(cmd), "mdb set admin_passwd %s", N_str); - snprintf(cmdbuf, sizeof(cmdbuf), "%s > %s 2>&1", cmd, p_name); - fp = popen(cmdbuf, "r"); -``` - -You don't have to be a security expert to see the problem here. But -one mans bug is another mans feature :-) - - -##### A303 - -The two strings S and M are url decoded and checked for special -characters. Then the **orginal** url encoded strings are written to -**/tmp/mydlink/reg_info** and SIGUSR1 is sent to the **da_adaptor** -process. Presumably triggering it to reread the reg_info file. - -It is pretty safe to assume that this provides some registration info -to the mydlink system, allowing it to connect to the cloud service. - -The set of allowed characters is rather interesting: -``` - "ABCDEFGHIJKLMNOPQRSTUVWXYZabcdefghijklmnopqrstuvwxyz0123456789 !\"#$%&'()*+,-./:;<=>?@[\\]^_`{|}~" -``` - -Which initially made me think that this was an obvious security hole, -since I missed the point that it's the url encoded strings that are -used on the command line. - -But given the quality of the rest of the code here, I would be very -surprised if there isn't an issue or ten in the da_adaptor code -allowing this to be abused. It's just a bit harder to figure out -without the source code. - - - -#### Manually restarting bluetoothd for debugging - -It can be useful to run bluetoothd in the foreground when debugging -BLE interaction, or testing modified versions of bluetoothd. Log in -using telnet or serial and simply stop and restart bluetoothd with the --d and -n options: - -``` -# /etc/rc.d/init.d/bluetoothd.sh stop -Stopping bluetoothd... ok. -# LD_LIBRARY_PATH=/var/bluetooth/lib /var/bluetooth/bin/bluetoothd -d -n -E -p "gatt,gatt_example" -bluetoothd[25020]: Bluetooth daemon 5.28 -bluetoothd[25020]: src/main.c:parse_config() parsing main.conf -bluetoothd[25020]: src/main.c:parse_config() discovto=0 -bluetoothd[25020]: src/main.c:parse_config() pairto=0 -bluetoothd[25020]: src/main.c:parse_config() auto_to=3600 -bluetoothd[25020]: src/main.c:parse_config() name=DCS-8000LH-CDEF -bluetoothd[25020]: src/main.c:parse_config() Key file does not have key 'Class' -bluetoothd[25020]: src/main.c:parse_config() Key file does not have key 'DeviceID' -bluetoothd[25020]: src/main.c:parse_config() Key file does not have key 'ReverseServiceDiscovery' -bluetoothd[25020]: src/main.c:parse_config() ControllerMode=le -bluetoothd[25020]: src/gatt.c:gatt_init() Starting GATT server -bluetoothd[25020]: src/adapter.c:adapter_init() sending read version command -bluetoothd[25020]: Starting SDP server -bluetoothd[25020]: src/sdpd-service.c:register_device_id() Adding device id record for 0002:1d6b:0246:051c -etc. -``` - -Note that the GATT GAP service will only pick up the device name -whenever it is set. This causes an empty Device Name characteristic -(0x2a00) after restarting bluetoothd. - -The name must therefore be changed and set again after every -bluetoothd restart as a workaround: - -``` -/var/bluetooth/bin/hciconfig hci0 name foo -/var/bluetooth/bin/hciconfig hci0 name DCS-8000LH-CDEF -``` - - -### Firmware updates - -There are at least two shell scripts providing a firmware update -service in the D-Link firmware: - - * /var/www/config/firmwareupgrade.cgi - * /sbin/fwupdate - -They are both pretty similar and obviously come from the same source. -The main difference is that firmwareupgrade.cgi provides the NIPCA -firmwareupgrade service, while fwupdate is a command line tool. - -The web service is most interesting for us, providing both the upload -and upgrade in one simple tool. The fwupdate tool is used by the -mydlink cloud tool **da_adaptor** , via an fw_upgrade symlink. - - -#### Downloading the latest OEM firmware - -The mydlink tools will set up two URLs in `/tmp/db/device.cf`: -``` - "FirmwareDaemonURL": "http://mp-eu-fwd.auto.mydlink.com:80/fw-upgrade", - "SecuredFirmwareDaemonURL": "https://mp-eu-fwd.auto.mydlink.com:443/fw-upgrade", -``` - -Calling either one of these with a model parameter will return a -download URL for the latest firmware version. Examples: - -``` -$ curl -D - http://mp-eu-fwd.auto.mydlink.com:80/fw-upgrade?model=DCS-8000LH -HTTP/1.1 200 OK -Date: Sun, 27 Oct 2019 16:27:24 GMT -Content-Length: 280 -Etag: "9a475c16361db8ba3ebfe679554680dbb6bf2c38" -Content-Type: text/html; charset=UTF-8 -Server: TornadoServer/5.1.1 - -{"code": 0, "fw_ver_type": "REGULAR", "process_time": 210, "main_board": {"url": "http://mydlinkmpfw.auto.mydlink.com/DCS-8000LH/DCS-8000LH_Ax_v2.03.02_3412.bin", "fw_version": "2.03.02", "md5": "3e26e96fcd8fcf711c1362a4cbfb2d48"}, "release_version": "3.2.7-b02", "device_id": ""} -``` - - -``` -$ curl -D - 'https://mp-eu-fwd.auto.mydlink.com:443/fw-upgrade?model=DCS-8100LH' -HTTP/1.1 200 OK -Date: Sun, 27 Oct 2019 16:35:39 GMT -Content-Length: 281 -Etag: "5714f3e62ca04e5c3465705cb4c7356f1d50e54f" -Content-Type: text/html; charset=UTF-8 -Server: TornadoServer/5.1.1 - -{"code": 0, "fw_ver_type": "REGULAR", "process_time": 210, "main_board": {"url": "https://mydlinkmpfw.auto.mydlink.com/DCS-8100LH/DCS-8100LH_Ax_v2.04.01_3619.bin", "fw_version": "2.04.01", "md5": "eb097a680754b94b81da6326b468121f"}, "release_version": "3.2.7-b03", "device_id": ""} -``` - -Download and verify the md5 sum: - -``` -$ curl -O https://mydlinkmpfw.auto.mydlink.com/DCS-8100LH/DCS-8100LH_Ax_v2.04.01_3619.bin - % Total % Received % Xferd Average Speed Time Time Time Current - Dload Upload Total Spent Left Speed -100 19.5M 100 19.5M 0 0 2457k 0 0:00:08 0:00:08 --:--:-- 2727k - -$ md5sum DCS-8100LH_Ax_v2.04.01_3619.bin -eb097a680754b94b81da6326b468121f DCS-8100LH_Ax_v2.04.01_3619.bin -``` - - -#### Signed and encrypted - -Looking at the contents of a firmware update from D-Link can be -demotivating at the beginning: - -``` -$ tar xvf DCS-8000LH_Ax_v2.02.02_3014.bin -update.bin.aes -update.aes -aes.key.rsa -certificate.info -sign.sha1.rsa - -$ file * -aes.key.rsa: data -certificate.info: ASCII text -sign.sha1.rsa: data -update.aes: data -update.bin.aes: data - -$ ls -l -total 10956 --rw-r--r-- 1 bjorn bjorn 128 Feb 14 10:58 aes.key.rsa --rw-r--r-- 1 bjorn bjorn 130 Feb 14 10:58 certificate.info --rw-r--r-- 1 bjorn bjorn 128 Feb 14 10:58 sign.sha1.rsa --rw-r--r-- 1 bjorn bjorn 10268368 Feb 14 10:58 update.aes --rw-r--r-- 1 bjorn bjorn 936464 Feb 14 10:58 update.bin.aes -``` - -So all the interesting stuff is AES encrypted, and the AES key is RSA -encrypted. The only directly readable file is this one, and it -doesn't tell us much: - -``` -$ cat certificate.info -Publisher:DMdssdFW1 -Supported Models:DCS-8000LH,DCS-8000LH -Firmware Version:1.0.0 -Target:update.bin -Build No:3014 -Contents:update -``` - -Not much we can do about this then. Or so it seems... Until we look -at **firmwareupgrade.cgi**, or **fwupdate** which has almost the same -code: - -```sh -verifyFirmware() { - result=uploadSign - #tar tf "$UPLOADBIN" > /dev/null 2> /dev/null || return 1 - fw_sign_verify.sh "$UPLOADBIN" /etc/db/verify.key > /dev/null 2> /dev/null || return 1 - return 0 -} - -decryptFirmware() { - result=uploadDecrypt - pibinfo PriKey > $dir/decrypt.key 2> /dev/null - fw_decrypt.sh $dir/decrypt.key $out > /dev/null 2> /dev/null || return 1 - return 0 -} -``` - -Can it be that simple? Yes, it is. - -Looking further at the **fw_sign_verify.sh** and **fw_decrypt.sh**, -used by both update tools, confirms it. The firmware is verified by -using the RSA public key in **/etc/db/verify.key** to decrypt the hash -in **sign.sha1.rsa**. Then it is decrypted using a key from the -factory data **pib** partition. - - - -#### Further unpacking the firmware update - -So we have the keys and the hashing algorithms we need to both verify -and decrypt this firmware. We can run the commands found in -**fw_decrypt.sh** to get the real contents (slightly adapted to modern -openssl versions): - -``` -$ openssl rsautl -decrypt -in aes.key.rsa -inkey decrypt.key -out aes.key - -$ openssl aes-128-cbc -v -md md5 -kfile aes.key -nosalt -d -in update.bin.aes -out update.bin -bufsize=8192 -*** WARNING : deprecated key derivation used. -Using -iter or -pbkdf2 would be better. -bytes read : 936464 -bytes written: 936454 - -$ openssl aes-128-cbc -v -md md5 -kfile aes.key -nosalt -d -in update.aes -out update -bufsize=8192 -*** WARNING : deprecated key derivation used. -Using -iter or -pbkdf2 would be better. -bytes read : 10268368 -bytes written: 10268355 - -$ file update.bin update -update.bin: POSIX shell script, ASCII text executable -update: data -``` - -OK, the **update** file is still in an unknown format, but at least -we have the tool used to write it to the system. And it is a shell -script, so we have the source to look at too! But 936454 bytes is a -hell of a shell script, and this is of course because most of it is an -uuencoded binary. So we don't know exactly what that does. But it is -named ddPack so a fair guess is that it is a tool for dd'ing multiple -file systems or other images packed as a single file. That's really -enough info. - -binwalk shows that the **update** file is just two squashfs systems -and a kernel, with a 1024 header of some sort. The header presumably -tells ddPack how it should apply these three images: - -``` -$ binwalk update - -DECIMAL HEXADECIMAL DESCRIPTION --------------------------------------------------------------------------------- -1024 0x400 Squashfs filesystem, little endian, version 4.0, compression:xz, size: 338755 bytes, 16 inodes, blocksize: 131072 bytes, created: 2019-02-14 09:58:28 -340992 0x53400 uImage header, header size: 64 bytes, header CRC: 0x675F081D, created: 2019-02-14 09:31:53, image size: 1661571 bytes, Data Address: 0x804D4960, Entry Point: 0x804D4960, data CRC: 0x73083021, OS: Linux, CPU: MIPS, image type: OS Kernel Image, compression type: none, image name: "linux_3.10" -2002627 0x1E8EC3 Squashfs filesystem, little endian, version 4.0, compression:xz, size: 8265620 bytes, 2145 inodes, blocksize: 131072 bytes, created: 2019-02-14 09:58:45 -``` - -But we can easily guess that without knowing anything about the -header. There is only one alternative: - * The kernel goes into the **kernel** partition - * The 8265620 bytes squasfs system goes into the **rootfs** partition - * The remaining squasfs system goes into the **userdata** partition - -So there is no need to analyze ddPack. We have the necessary entry -points for **fwupdate** or **firmwareupgrade.cgi** in the -**update.bin** script, and that's what we needed to know for the next -step: - - -#### Creating our own firmware updates - -We do have shell access, so we can simply write the file systems we -want to flash as shown earlier. We don't need to use the D-Link -scripts. But where's the fun in that? - -There is one challenge here: The D-Link tools are expecting signed and -encrypted firmware updates. They will run their verifyFirmware() and -decryptFirmware() functions, and fail the update if any of the returns -an error. - -But bailing out on verification errors is only the default setting, as -illustrated by this code from **fwupdate** (there is code with similar -functionality in **firmwareupgrade.cgi**): - - -```sh - TrustLevel=`tdb get SecureFW _TrustLevel_byte` - verifyFirmware - ret=$? - case $ret in - 2) - sign="not_signed" - ;; - 0) - sign="trust" - ;; - *) - sign="untrust" - ;; - esac - if [ "$do_up" = "1" -a "$ret" != "0" -a "$TrustLevel" = "1" ]; then - echo "3" - return 1 - fi -``` - -So we don't need to sign the firmware if we change the **SecureFW -_TrustLevel** setting. Or we can even sign it with a key unknown to -the camera if we like. Which can be useful if we ever replace the -[**rootfs**]](#Partitions), since it will allow us to install our own verification -key and use it with D-Links tools. - -But what about the encryption? This cannot be disabled. This gets -even better: The decrypting key so graciously provided to us in the -[**pib**](#Partitions) partition is an RSA private key. So not only can we decrypt -the firmware with it, but we can also encrypt! Nice. - - -The [**Makefile**](Makefile) in this repo has examples of how to use this to -create firmware update images which are accepted by the **fwupdate** -and **firmwareupgrade.cgi** tools. It uses an alternatative -[**update.bin**](update.sh) made to modify only the [**userdata**](#Partitions) partition. This -way we can install our own code in the camera, but still leave the -D-Link camera OS unmodified. - - -#### <a name="BuildFirmware"></a>Bulding the example firmware update in this repo - -Rebuilding the example is as easy as typing **make**. The Makefile is a -noisy one, so you can see all that's going on: -``` -$ make -echo "WARNING: keys/DCS-8000LH-sign.pem is missing - using a new abitrary key instead" -WARNING: keys/DCS-8000LH-sign.pem is missing - using a new abitrary key instead -[ -f random-signkey.pem ] || openssl genrsa -out random-signkey.pem -Generating RSA private key, 2048 bit long modulus (2 primes) -...............................................................................................................................+++++ -........................................................................................................................................................+++++ -e is 65537 (0x010001) -openssl rsa -pubout -in random-signkey.pem -out verify.key -writing RSA key -echo "Publisher:DMdssdFW1" >certificate.info -echo "Supported Models:DCS-8000LH,DCS-8000LH" >>certificate.info -echo "Firmware Version:1.0.0" >>certificate.info -echo "Target:update.bin" >>certificate.info -echo "Build No:9999" >>certificate.info -echo "Contents:update" >>certificate.info -openssl rand 16 > aes.key -openssl rsautl -encrypt -in aes.key -inkey keys/DCS-8000LH-PriKey.pem -out aes.key.rsa -sed -ne 's/"//g' -e 's/^VERSION *= *//p' dcs8000lh-configure.py >version -mksquashfs version opt.local opt.squashfs -all-root -comp xz -Parallel mksquashfs: Using 4 processors -Creating 4.0 filesystem on opt.squashfs, block size 131072. -[===============================================================================================================================================================================================================|] 2/2 100% - -Exportable Squashfs 4.0 filesystem, xz compressed, data block size 131072 - compressed data, compressed metadata, compressed fragments, compressed xattrs - duplicates are removed -Filesystem size 1.08 Kbytes (0.00 Mbytes) - 60.69% of uncompressed filesystem size (1.79 Kbytes) -Inode table size 98 bytes (0.10 Kbytes) - 100.00% of uncompressed inode table size (98 bytes) -Directory table size 46 bytes (0.04 Kbytes) - 100.00% of uncompressed directory table size (46 bytes) -Number of duplicate files found 0 -Number of inodes 3 -Number of files 2 -Number of fragments 1 -Number of symbolic links 0 -Number of device nodes 0 -Number of fifo nodes 0 -Number of socket nodes 0 -Number of directories 1 -Number of ids (unique uids + gids) 1 -Number of uids 1 - root (0) -Number of gids 1 - root (0) -openssl aes-128-cbc -md md5 -kfile aes.key -nosalt -e -out update.aes -in opt.squashfs -*** WARNING : deprecated key derivation used. -Using -iter or -pbkdf2 would be better. -*** WARNING : deprecated key derivation used. -Using -iter or -pbkdf2 would be better. -sed -e "s/@@MODEL@@/\"DCS-8000LH\"/" -e "s/@@MD5SUM@@/\"f1a1d3952c1630e5adb53e7f93b59d5e\"/" -e "s/@@VERSION@@/\"1.0.0-9999\"/" update.sh >update.bin -openssl aes-128-cbc -md md5 -kfile aes.key -nosalt -e -out update.bin.aes -in update.bin -*** WARNING : deprecated key derivation used. -Using -iter or -pbkdf2 would be better. -openssl dgst -sha1 update.aes | cut -d' ' -f2 > update.sha1 -cat update.bin.aes aes.key.rsa certificate.info update.sha1 | openssl dgst -sha1 | cut -d' ' -f2 > sign.sha1 -openssl rsautl -sign -inkey random-signkey.pem -out sign.sha1.rsa -in sign.sha1 -tar cvf fw.tar certificate.info aes.key.rsa sign.sha1.rsa update.aes update.bin.aes verify.key -certificate.info -aes.key.rsa -sign.sha1.rsa -update.aes -update.bin.aes -verify.key - -``` - -This will produce a new **fw.tar** firmware update image. - - -## Contact - - -Please contact me on bjorn@mork.no if you have questions, comments or -just want to say hi. - -But please note that I won't be able to provide any support for this. -I am making this information available for educational purposes. If -you find it useful, then great! If you brick a camera, then I am -truly sorry about that. But there isn't much I can do about it.... |