# D-Link DCS-8000LH
These are random notes descibing how I changed my D-Link DCS-8000LH
from a cloud camera to a locally managed IP camera, streaming H.264
MPEG-TS over HTTP and HTTPS. Some of the tools and ideas might work
for other cameras too, given some model specific adaptation.
Complete defogging requires modifying one of the file systems in the
camera. This implies a slight risk of ending up with a brick. You
have now been warned...
This is tested and developed on firmware versions v2.01.03 and
v2.02.02 only. The final complete procedure has only been tested with
v2.02.02. It should work fine with v2.01.03 and other versions, in
theory, but could fail like anything untested. Please let me know if
you have an original v2.01.03 firmware update from D-Link, or any
other version for that matter, or know where firmware updates can be
downloaded.
The v2.02.02 update is available from
https://mydlinkmpfw.auto.mydlink.com/DCS-8000LH/DCS-8000LH_Ax_v2.02.02_3014.bin
at the time of writing. But I assume this link stops working as soon
as there is a newer version available.
## Changelog
* v0.01 (20190515) - initial published version
* v0.02 (20190515) - added RTSP support and information
## Problem
My D-Link DCS-8000LH came with firmware version 2.01.03 from factory.
This firmware is locked to the [**mydlink**](https://www.mydlink.com)
app/cloud service. It does not provide a local NIPCA compatible HTTP
API or similar, and it does not stream video over HTTP, HTTPS or RTSP.
Additionally, there is no way to downgrade the firmware. In fact,
there is no documented way to install any firmware image at all,
except trusting the "mydlink" cloud service to do it for you.
## Solution
#### Primary goals achieved:
* configuration of network and admin password via Bluetooth LE, without
registering with D-Link or using the [**mydlink**](https://www.mydlink.com) app at all
* streaming MPEG-TS directly from camera over HTTP and HTTPS
* direct RTSP streaming
* NIPCA API configuration over HTTP and HTTPS, supporting settings
like LED, nightmode, etc
#### And some extra goodies which came for free
* Firmware upgrades and downgrades via HTTP
* telnet server with a root account (admin/PIN Code)
* easy access to serial console, using the same root account
* running arbitrary commands on the camera using Bluetooth
Read on for all the gory details...
### Requirements
* a Linux PC with a Bluetooth controller
* python3 with @IanHarvey's
[**bluepy**](https://ianharvey.github.io/bluepy-doc/index.html)
library
* WiFi network with WPA2-PSK and a known password
* mksquashfs from the squashfs-tools package
* a tftp server or web server accepting file uploads (for backups)
* guts :-)
Most recent Linux distros will probably do. The bluepy library can be
installed using pip if it is not available as a distro package. Other
types of WiFi networks might work, but has not been tested with the
provided tools. The squashfs-tools are only necessary if you want to
rebuild the "mydlink" alternative file system. I assume you can even
run the tools without installing Linux, by using a Linux "Live"
CD/DVD/USB stick.
This was developed and tested on Debian Buster.
### Camera configuration using the Bluetooth LE GATT API
The "mydlink" app uses Bluetooth LE for camera setup, authenticated by
the camera pincode. This repo includes an alternative python script
with a few extra goodies, but needing a better name:
[**dcs8000lh-configure.py**](dcs8000lh-configure.py)
(Why not an Android app? Because it would take me much more time to
write. Should be fairly easy to do though, for anyone with enough
interest. You can find all the necessary protocol details here and in
the python code. Please let me know if you are interested)
The script does not support scanning for the simple reason that this
would require root access for not real gain. You have to provide the
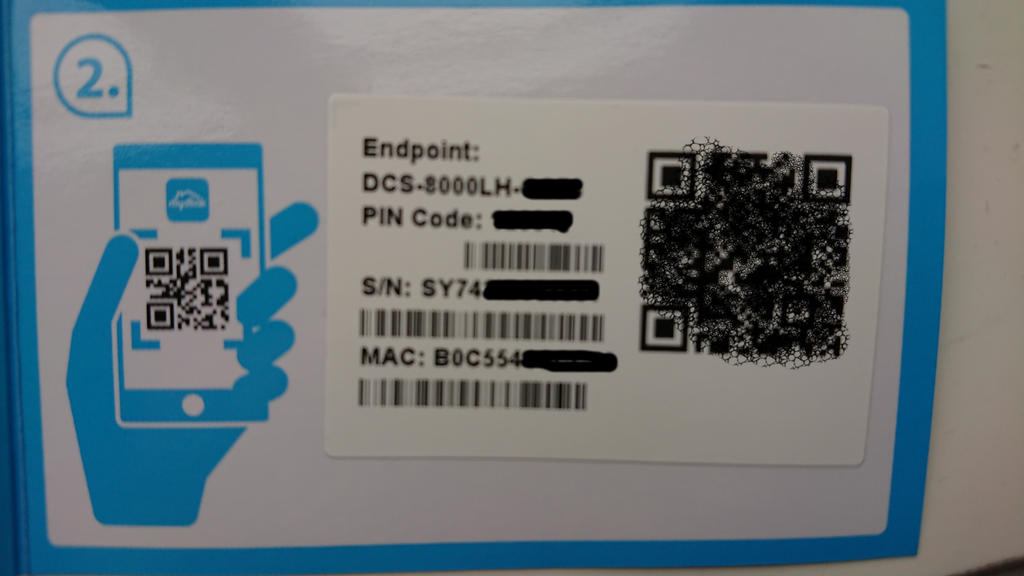
**PIN Code** from the camera label
anyway. Reading the **MAC ID** as well is simple enough

The **PIN Code** and **MAC** is also printed on the code card that
came with the camera:
Note that the command line **address** paramenter must be formatted as
**01:23:45:67:89:AB** instead of the **0123456789AB** format printed
on the label.
Current script help text at the time of writing shows what the script
can do:
```
$ ./dcs8000lh-configure.py -h
usage: dcs8000lh-configure.py [-h] [--essid ESSID] [--wifipw WIFIPW]
[--survey] [--netconf] [--sysinfo]
[--command COMMAND] [--telnetd] [--lighttpd]
[--rtsp] [--unsignedfw] [--attrs] [-V]
address pincode
IPCam Bluetooth configuration tool.
positional arguments:
address IPCam Bluetooth MAC address (01:23:45:67:89:AB)
pincode IPCam PIN Code (6 digits)
optional arguments:
-h, --help show this help message and exit
--essid ESSID Connect to this WiFi network
--wifipw WIFIPW Password for ESSID
--survey List WiFi networks seen by the IPCam
--netconf Print current network configuration
--sysinfo Dump system configuration
--command COMMAND Run command on IPCam
--telnetd Start telnet server on IPCam
--lighttpd Start web server on IPCam
--rtsp Enable access to RTSP server on IPCam
--unsignedfw Allow unsigned firmware
--attrs Dump IPCam GATT characteristics
-V, --version show program's version number and exit
```
#### Real session excample after a clean upgrade to firmware v2.02.02, followed by factory reset
1. Start by making sure the camera can see our WiFi network. This
also verifies that we can connect and authenticate against the
Bluetooth LE IPCam service, without making any changes to any
camera settings:
```
$ ./dcs8000lh-configure.py B0:C5:54:AA:BB:CC 123456 --survey
Connecting to B0:C5:54:AA:BB:CC...
Verifying IPCam service
Connected to 'DCS-8000LH-BBCC'
DCS-8000LH-BBCC is scanning for WiFi networks...
{'I': 'AirLink126FD4', 'M': '0', 'C': '11', 'S': '4', 'E': '2', 'P': '47'}
{'I': 'Antiboks', 'M': '0', 'C': '11', 'S': '4', 'E': '2', 'P': '73'}
{'I': 'ASV17', 'M': '0', 'C': '11', 'S': '4', 'E': '2', 'P': '47'}
{'I': 'ASV17-dlink', 'M': '0', 'C': '6', 'S': '4', 'E': '2', 'P': '57'}
{'I': 'DIRECT-33-HP%20ENVY%205000%20series', 'M': '0', 'C': '1', 'S': '4', 'E': '2', 'P': '46'}
{'I': 'fjorde123', 'M': '0', 'C': '1', 'S': '4', 'E': '2', 'P': '55'}
{'I': 'JOJ', 'M': '0', 'C': '11', 'S': '4', 'E': '2', 'P': '48'}
{'I': 'Kjellerbod', 'M': '0', 'C': '11', 'S': '4', 'E': '2', 'P': '75'}
{'I': 'Landskap_24', 'M': '0', 'C': '11', 'S': '4', 'E': '2', 'P': '46'}
{'I': 'mgmt', 'M': '0', 'C': '1', 'S': '4', 'E': '2', 'P': '72'}
{'I': 'Rindedal', 'M': '0', 'C': '11', 'S': '4', 'E': '2', 'P': '68'}
{'I': 'risikovirus', 'M': '0', 'C': '1', 'S': '4', 'E': '2', 'P': '45'}
{'I': 'risikovirus%20WIFI', 'M': '0', 'C': '11', 'S': '4', 'E': '2', 'P': '45'}
{'I': 'Stavik2014', 'M': '0', 'C': '6', 'S': '4', 'E': '2', 'P': '47'}
{'I': 'TomterNett1', 'M': '0', 'C': '6', 'S': '4', 'E': '2', 'P': '44'}
{'I': 'VIF', 'M': '0', 'C': '11', 'S': '4', 'E': '2', 'P': '47'}
Done.
```
2. We're going to use the 'Kjellerbod' network, so that looks good.
Select it and give the associated WiFi password to the camera:
```
$ ./dcs8000lh-configure.py B0:C5:54:AA:BB:CC 123456 --essid Kjellerbod --wifipw redacted
Connecting to B0:C5:54:AA:BB:CC...
Verifying IPCam service
Connected to 'DCS-8000LH-BBCC'
DCS-8000LH-BBCC is scanning for WiFi networks...
Will configure: M=0;I=Kjellerbod;S=4;E=2;K=redacted
Done.
```
3. Verify that the camera connected to the Wifi network and got an
address. If not, go back and try again, making sure you are using
the correct WiFi password:
```
$ ./dcs8000lh-configure.py B0:C5:54:AA:BB:CC 123456 --netconf
Connecting to B0:C5:54:AA:BB:CC...
Verifying IPCam service
Connected to 'DCS-8000LH-BBCC'
wifi link is Up
wifi config: {'M': '0', 'I': 'Kjellerbod', 'S': '4', 'E': '2'}
ip config: {'I': '192.168.2.37', 'N': '255.255.255.0', 'G': '192.168.2.1', 'D': '148.122.16.253'}
Done.
```
**WARNING**: You must make a backup of your device at this point if
you haven't done so already. See the [**Backup**](#Backup) section
below. I only skipped it in this example because I already had a
complete backup of my camera.
4. We need HTTP NIPCA API for the remaining tasks, so temporarily
start lighttpd on the camera:
```
$ ./dcs8000lh-configure.py B0:C5:54:AA:BB:CC 123456 --lighttpd
Connecting to B0:C5:54:AA:BB:CC...
Verifying IPCam service
Connected to 'DCS-8000LH-BBCC'
Attempting to run '[ $(tdb get HTTPServer Enable_byte) -eq 1 ] || tdb set HTTPServer Enable_byte=1' on DCS-8000LH-BBCC by abusing the 'set admin password' request
Attempting to run '/etc/rc.d/init.d/extra_lighttpd.sh start' on DCS-8000LH-BBCC by abusing the 'set admin password' request
Done.
```
Note that this implicitly changes a couple of settings which are
stored in the ["db"](#Partitions) NVRAM partition, and therefore will persist until
the next factory reset:
* extra_lighttpd.sh will exit without doing anything unless
**HTTPServer Enable** is set
* the admin password is set both because we're abusing that BLE
request, and because we need it for the HTTP API access. The
script only supports setting the password to the **PIN Code**.
*This password restriction is because I'm lazy - there is nothing in
the camera or protocol preventing the password from being set to
something else. But the script would then need the new password as
an additional input parameter for most commands*
5. Disable firmware signature verification. Only firmwares signed by
D-Link are accepted by default. This feature can be disabled by
changing a variable in the ["db"](#Partitions) NVRAM partition:
```
$ ./dcs8000lh-configure.py B0:C5:54:AA:BB:CC 123456 --unsignedfw
Connecting to B0:C5:54:AA:BB:CC...
Verifying IPCam service
Connected to 'DCS-8000LH-BBCC'
Attempting to run 'tdb set SecureFW _TrustLevel_byte=0' on DCS-8000LH-BBCC by abusing the 'set admin password' request
Done.
```
6. The final step is the dangerous one. It replaces the file system
on the [**userdata**](#Partitions) partition with our home cooked one. The D-Link
firmware uses this partition exclusively for the "mydlink" cloud
tools, which we don't need. The rest of the system is not touched
by our firmware update. The camera will therefore run exactly the
same kernel and rootfs as before the update, whatever version they
were. I.e., the firmware version does not change - only the
"mydlink" version.
**NOTE**; You need to [build](#BuildFirmware) a **fw.tar** firmware
update image first.
```
$ curl --http1.0 -u admin:123456 --form upload=@fw.tar http://192.168.2.37/config/firmwareupgrade.cgi
upgrade=ok
```
See the section on [error handling](#Errors) if the upgrade request
returned anything else.
The camera will reboot automatically at this point, assuming the
update was successful. From now both with telnetd and lighttpd
running, and with external access to the RTSP server. All services
will use the same **admin:PIN Code** account for authentication.
So we now have access to direct [streaming](#Streaming) over HTTP,
HTTPS and RTSP without ever having been in contact with the
[**mydlink**](https://www.mydlink.com) service!
### Streaming video locally
Which was the whole point of all this... We can now stream directly
from the camera using for example:
#### HTTP or HTTPS
```
vlc https://192.168.2.37/video/mpegts.cgi
vlc https://192.168.2.37/video/flv.cgi
```
Authenticate using the **admin** user with **PIN Code** as password
AFAICS, this camera does not support MJPEG encoding. But you can
always use ffmpeg to transcode the H.264 anyway. Looking closer at a
stream sample:
```
$ curl --insecure -u admin:123456 https://192.168.2.37/video/mpegts.cgi>/tmp/stream
% Total % Received % Xferd Average Speed Time Time Time Current
Dload Upload Total Spent Left Speed
0 93.1G 0 438k 0 0 92872 0 12d 11h 0:00:04 12d 11h 92853^C
$ mediainfo /tmp/stream
General
ID : 1 (0x1)
Complete name : /tmp/stream
Format : MPEG-TS
File size : 500 KiB
Duration : 5 s 433 ms
Overall bit rate mode : Variable
Overall bit rate : 752 kb/s
Video
ID : 257 (0x101)
Menu ID : 1 (0x1)
Format : AVC
Format/Info : Advanced Video Codec
Format profile : High@L4
Format settings, CABAC : Yes
Format settings, ReFrames : 1 frame
Format settings, GOP : M=1, N=30
Codec ID : 27
Duration : 5 s 450 ms
Width : 1 280 pixels
Height : 720 pixels
Display aspect ratio : 16:9
Frame rate mode : Variable
Color space : YUV
Chroma subsampling : 4:2:0
Bit depth : 8 bits
Scan type : Progressive
Audio
ID : 256 (0x100)
Menu ID : 1 (0x1)
Format : AAC
Format/Info : Advanced Audio Codec
Format version : Version 2
Format profile : LC
Muxing mode : ADTS
Codec ID : 15
Duration : 3 s 456 ms
Bit rate mode : Variable
Channel(s) : 1 channel
Channel positions : Front: C
Sampling rate : 16.0 kHz
Frame rate : 15.625 FPS (1024 spf)
Compression mode : Lossy
```
#### RTSP
Direct RTSP access is also supported, using the same **admin** user.
The RTSP URLs are configurable, so the proper way to use RTSP is to
first check the URL of the wanted profile using the NIPCA API:
```
$ curl -u admin:123456 --insecure 'https://192.168.2.37/config/rtspurl.cgi?profileid=1'
profileid=1
urlentry=live/profile.0
video_codec=H264
audio_codec=OPUS
```
and then connect to this RTSP URL:
```
$ vlc rtsp://192.168.2.37/live/profile.0
```
Note that persistent RTSP access can be enabled with original
unmodified D-Link firmware, using the Bluetooth **--rtsp** option.
This modifies the necessary settings. The **rtspd** service is
already started by default in the original firmware.
So there is no need to mess with the firmware at all if all you want
is RTSP.
#### Errors during firmware update via HTTP
The **firmwareupgrade.cgi** script running in the camera isn't much
smarter than the rest of the system, so there are a few important
things keep in mind. These are found by trial-and-error:
* HTTP/1.1 might not work - the firmwareupgrade.cgi script does not support **100 Continue** AFAICS
* The firmware update image should be provided as a **file** input field from a form
* The field name must be **upload**.
Use the exact curl command provided above, replacing only the PIN
Code, IP address and firmware filename. This should work. Anything
else might not.
The camera must be manually rebooted by removing power or pressing
reset if the firmware upgrade fails for any reason. The
**firmwareupgrade.cgi** script stops most processes, inluding the
Bluetooth handler, and fails to restart them on errors.
There will be no permanent harm if the upload fails. But note that
you have to repeat the **--lighttpd** step after rebooting the camera,
before you can retry. It does not start automatically until we've
installed our modified "mydlink" alternative.
The contents of the fw.tar file must obviously be a valid, encrypted,
firmware update intended for the specified hardware. It must also be
signed. But the signing key can be unknown to the camera provided the
previous **--unsignedfw** request above was successful.
The [**Makefile**](Makefile) provided here shows how to [build](#BuildFirmware) a valid firmware
update, but for the DCS-8000LH only! It does not support any other
model. It will create a new throwaway signing key if it canæt find a
real one, and include the associated public key in the archive in case
you want to verify the signature manually.
Note that the encryption key might be model specific. I do not know
this as I have no other model to look at. Please let me know if you
have any information on this topic.
The encryption key is part ot the [**pib**](#Partitions) partition, and can be
read from a shell using
```
pibinfo PriKey
```
Or you can simply look at your partition backup. The key is stored as
a plain text *RSA PRIVATE KEY* PEM blob, so it is easy to spot. This
repo includes a copy of my [key](keys/DCS-8000LH-PriKey.pem) as I see
no point in attempting to keep a well known shared key like this one
"secret"
### Backup
Create a backup of everything *before* you mess up. Restoring will be
hard anyway, so don't rely on that. But you can forget about
restoring at all unless you have a backup, so make it anyway.
Note that the [**pib**](#Partitions) partition contains data which are
specific to **your** camera, and cannot be restored from any other
source! This includes
* model number
* hardware revision
* mac address
* feature bits
* private keys, pincode and passwords
Well, OK, we can restore most of the [**pib**](#Partitions) using information from
the [camera label](https://www.mork.no/~bjorn/dcs8000lh/dcs8000lh-label.jpg), but
it's better to avoid having to do that...
A backup is also useful for analyzing the file systems offline.
Making a backup without networking is inconvenient, so setup
networking first. In theory, you could dump the flash to the serial
console. But this would be very time consuming and tiresome.
The D-Link firmware provides a selection of network file transfer
tools. Pick anyone you like:
* tftp
* wget
* curl
* ...and probably more
I've been using tftp for my backups because it is simple. You'll
obviously need a tftp server for this. Google for instructions on
setting that up. You could alternatively set up a web server and use
wget or curl to post the files there, but this is more complx to set
up IMHO.
Here is one example of how to enable temporary telnet access and
copying all camera flash partitions to a tftp server:
```
$ ./dcs8000lh-configure.py B0:C5:54:AA:BB:CC 123456 --telnetd
Connecting to B0:C5:54:AA:BB:CC...
Verifying IPCam service
Connected to 'DCS-8000LH-BBCC'
Adding the 'admin' user as an alias for 'root'
Attempting to run 'grep -Eq ^admin: /etc/passwd||echo admin:x:0:0::/:/bin/sh >>/etc/passwd' on DCS-8000LH-BBCC by abusing the 'set admin password' request
Setting the 'admin' user password to '123456'
Attempting to run 'grep -Eq ^admin:x: /etc/passwd&&echo admin:123456|chpasswd' on DCS-8000LH-BBCC by abusing the 'set admin password' request
Starting telnetd
Attempting to run 'pidof telnetd||telnetd' on DCS-8000LH-BBCC by abusing the 'set admin password' request
Attempting to run '[ $(tdb get HTTPServer Enable_byte) -eq 1 ] || tdb set HTTPServer Enable_byte=1' on DCS-8000LH-BBCC by abusing the 'set admin password' request
Attempting to run '/etc/rc.d/init.d/extra_lighttpd.sh start' on DCS-8000LH-BBCC by abusing the 'set admin password' request
Done.
$ telnet 192.168.2.37
Trying 192.168.2.37...
Connected to 192.168.2.37.
Escape character is '^]'.
localhost login: admin
Password:
BusyBox v1.22.1 (2019-02-14 17:06:35 CST) built-in shell (ash)
Enter 'help' for a list of built-in commands.
# for i in 0 1 2 3 4 5 6 7 8; do tftp -l /dev/mtd${i}ro -r mtd$i -p 192.168.2.1; done`
```
Change 192.168.2.37 to the address of your camera and 192.168.2.1 to
the address of your tftp server. Note that most tftp servers require
existing and writable destination files. Refer to your tftp server docs
for details.
## All the gory details
### Restoring original D-Link firmware
The D-Link firmware, including the mydlink tools in the
[**userdata**](#Partitions) partition, can be restored by doing a
manual firmware upgrade providing a firmware update from D-Link. Real
example, going back to v2.02.02:
```
$ curl --http1.0 -u admin:123456 --form upload=@DCS-8000LH_Ax_v2.02.02_3014.bin http://192.168.2.37/config/firmwareupgrade.cgi
curl: (52) Empty reply from server
```
I don't know why I got that **Empty reply** warning instead of the
expected **upgrade=ok**, but update went fine so I guess it can safely
be ignored. Might be a side effect of rewriting the root file system,
which the firmwareupgrade.cgi script is running from.
### Serial console
Entirely optional. The defogging procedure does not require console
access, but it can be very useful when debugging problems related to
network configuration etc.
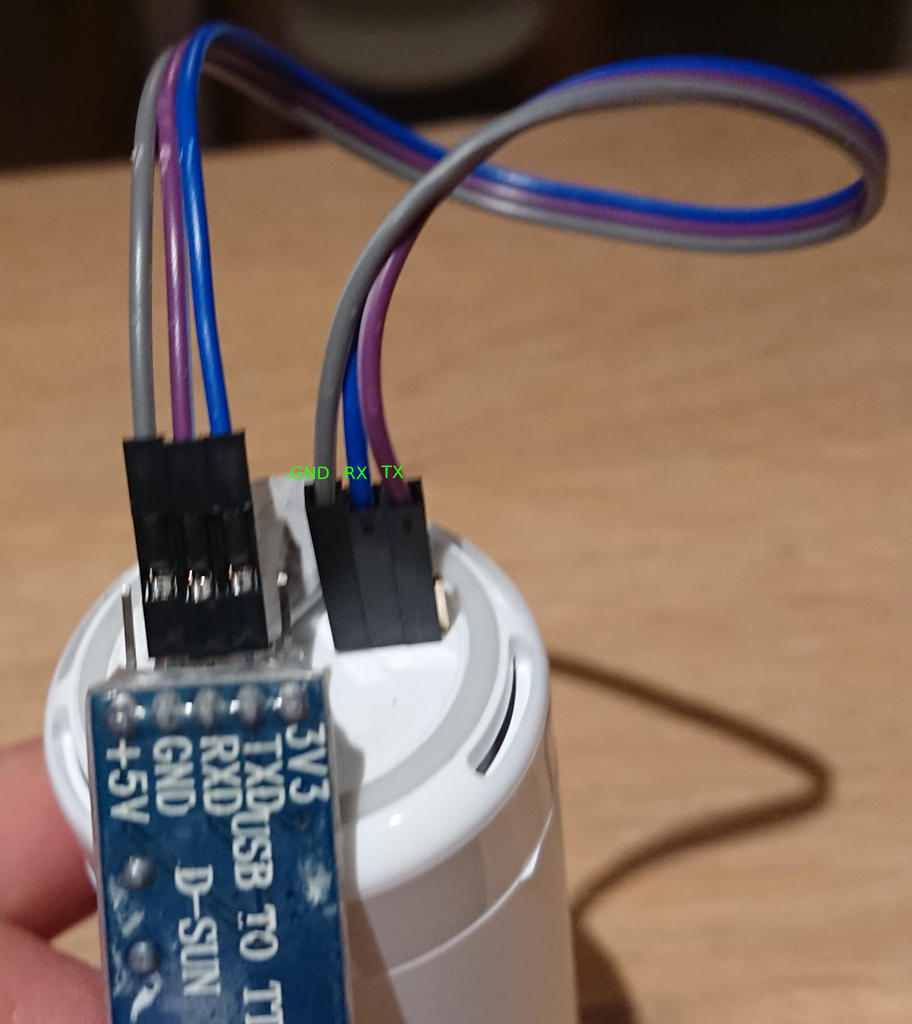
There is a 4 hole female header with 2 mm spacing in the bottom of the
camera. This header is easily accessible without opening the case at
all. But you will need to remove the bottom label to find it:
Take a picure of the lable or save the information somewhere else
first, in case you make the it unreadable in the process.
Mate with a 3 (or 4) pin male 2 mm connector, or use sufficiently
solid wires. The pins need to be 6-10 mm long. The pins will mess up the QR code, but the rest of the label can be left intact if you're careful:
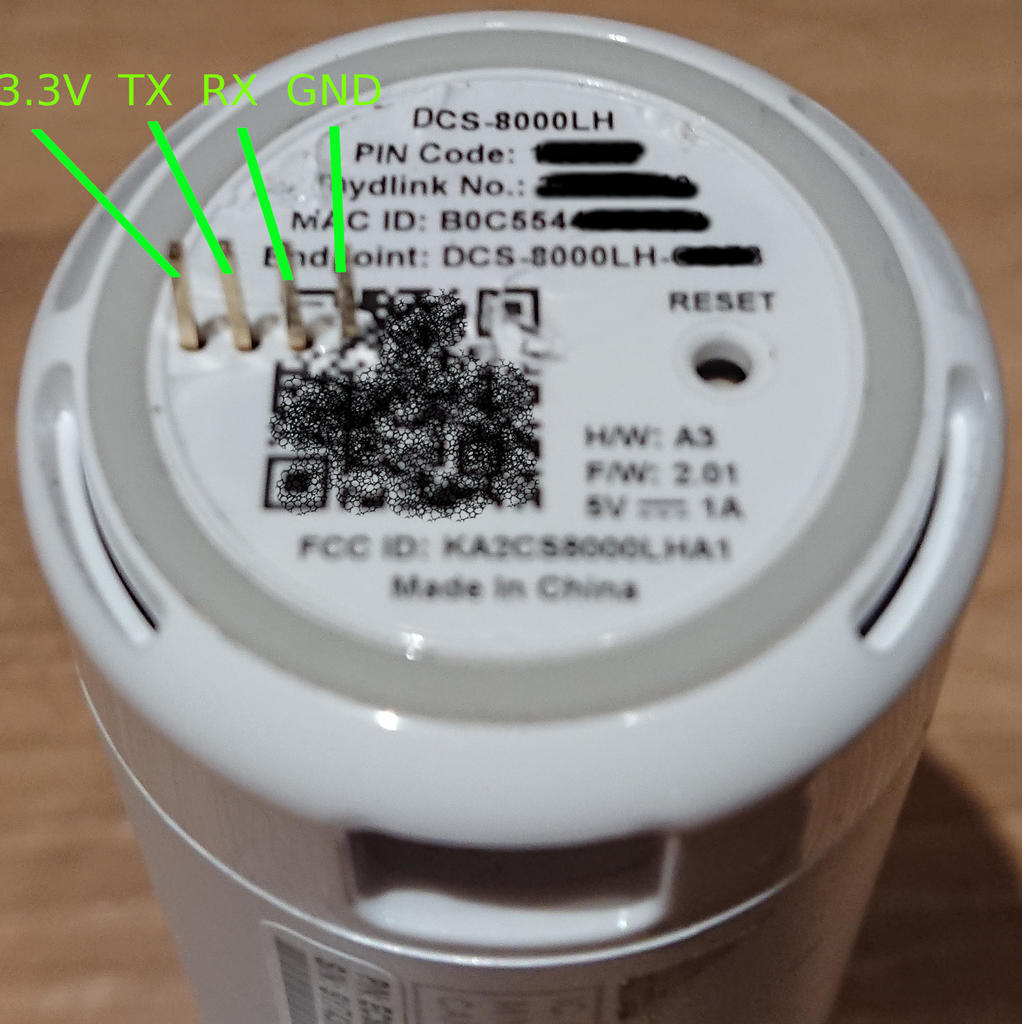
The pinout seen from egde to center of camera is:
| 1 | 2 | 3 | 4 |
|------|----|----|-----|
| 3.3V | TX | RX | GND |
and the serial port parameters are 57600 8N1.
You obviously need a 3.3V TTL adapter for this, Look at for example
at the generic OpenWrt console instructions if you need guidance.
Do not connect the 3.3V pin. All USB TTL adapters are powered by the
USB bus.
### Opening the case
Remove the top and bottom parts of the sylinder. I assume the two
remaning halves of the sylinder are simple held together by clips, but
I did not verify this after discovering the easily accessible console
header.
The top lid is clipped on:
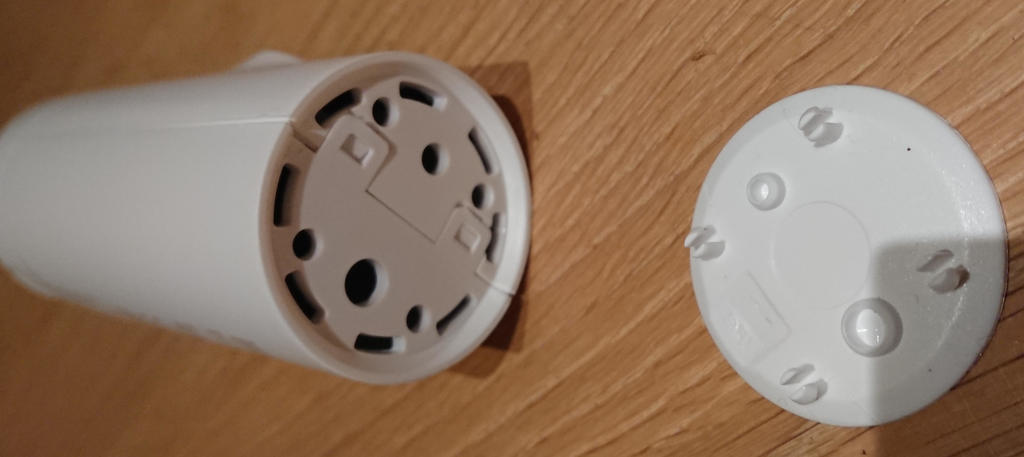
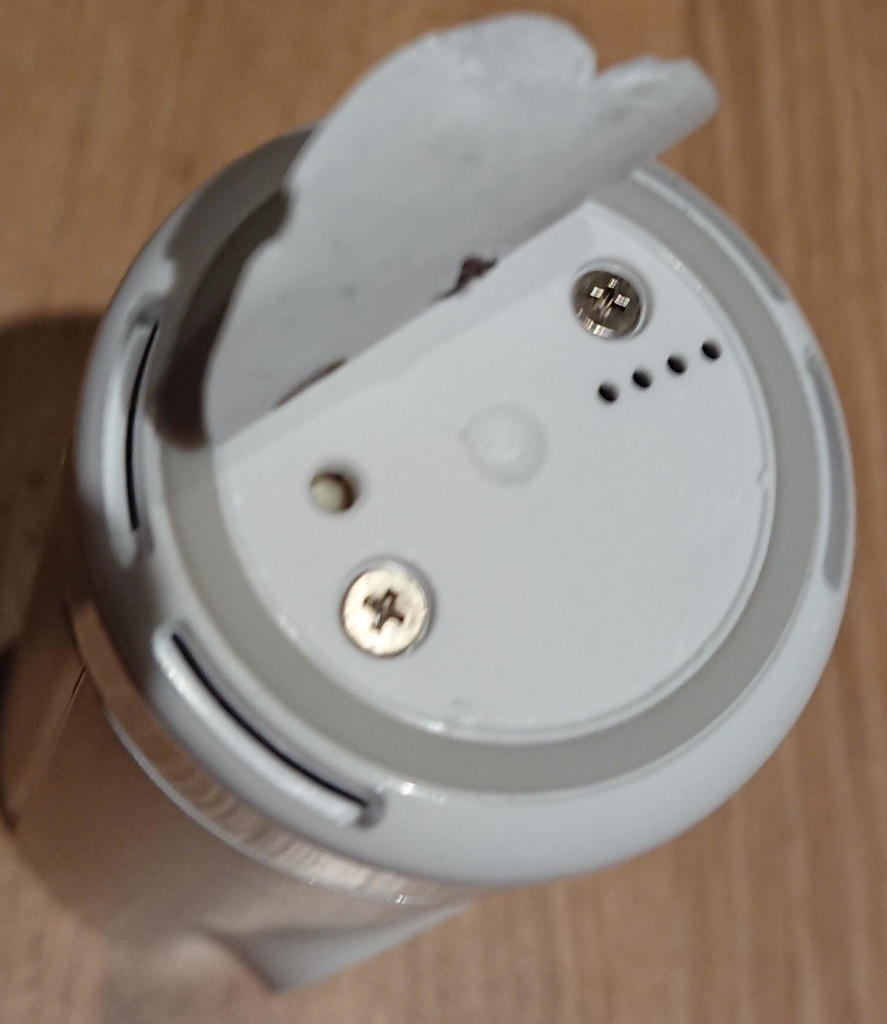
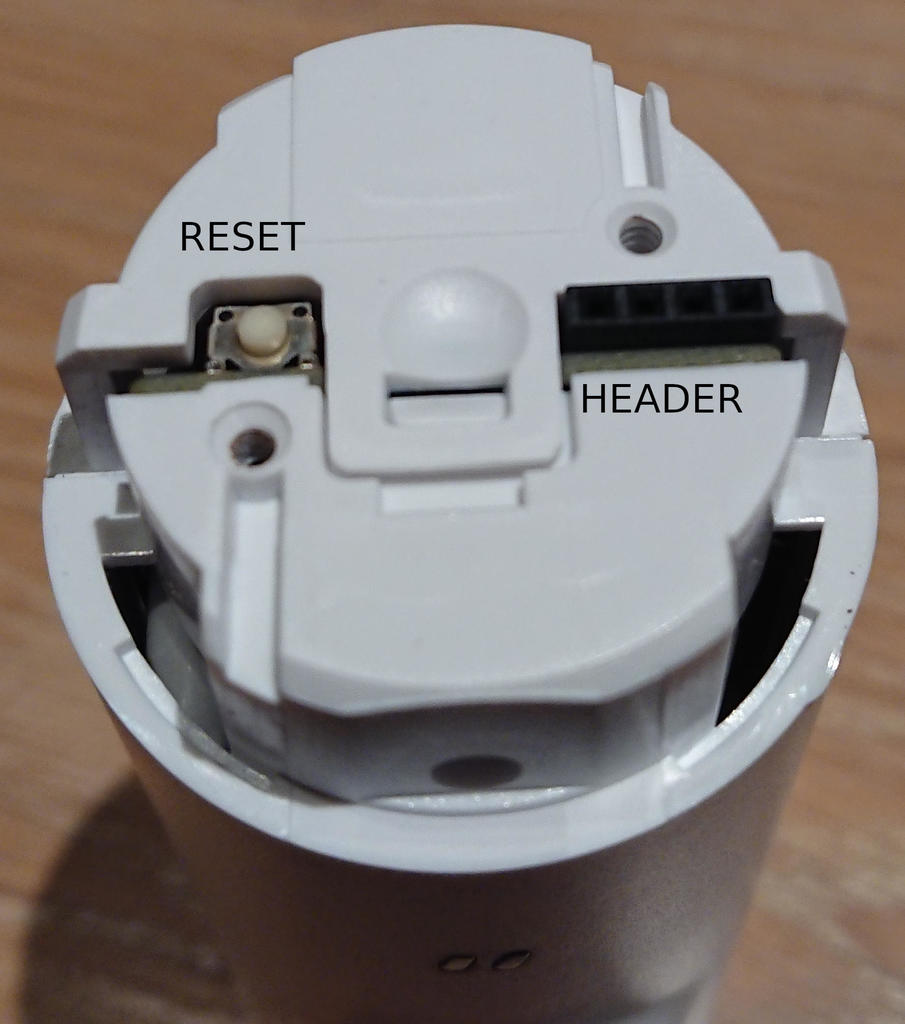
The bottom cover is held in place by two screws under the label:

Removing the bottom cover reveals the reset button and the console header:
### U-Boot
My DCS-8000LH came with this boot loader:
`U-Boot 2014.01-rc2-V1.1 (Jun 06 2018 - 03:44:37)`
But it is patched/configured to require a password for access to the
U-Boot prompt. Fortunately, D-Link makes the password readily
available in their GPL package :-) It is found in the file
`DCS-8000LH-GPL/configs/gpl_defconfig`:
`ALPHA_FEATURES_UBOOT_LOGIN_PASSWORD="alpha168"`
Enter **alpha168** password when you see
`Press ESC to abort autoboot in 3 seconds`
and you'll get a `rlxboot#` prompt, with access to these U-Boot commands :
```
rlxboot# ?
? - alias for 'help'
base - print or set address offset
bootm - boot application image from memory
bootp - boot image via network using BOOTP/TFTP protocol
cmp - memory compare
coninfo - print console devices and information
cp - memory copy
crc32 - checksum calculation
echo - echo args to console
editenv - edit environment variable
efuse - efuse readall | read addr
env - environment handling commands
fephy - fephy read/write
go - start application at address 'addr'
help - print command description/usage
imxtract- extract a part of a multi-image
loadb - load binary file over serial line (kermit mode)
loadx - load binary file over serial line (xmodem mode)
loady - load binary file over serial line (ymodem mode)
loop - infinite loop on address range
md - memory display
mm - memory modify (auto-incrementing address)
mw - memory write (fill)
nm - memory modify (constant address)
ping - send ICMP ECHO_REQUEST to network host
printenv- print environment variables
reset - Perform RESET of the CPU
setenv - set environment variables
setethaddr- set eth address
setipaddr- set ip address
sf - SPI flash sub-system
source - run script from memory
tftpboot- boot image via network using TFTP protocol
tftpput - TFTP put command, for uploading files to a server
tftpsrv - act as a TFTP server and boot the first received file
update - update image
version - print monitor, compiler and linker version
```
Using the boot loader for image manipulation will be hard though,
since the camera has no ethernet, USB or removable flash and the boot
loader has no WiFi driver. It is probably possible to load an image
over serial, but I don't have the patience for that...
The environment is fixed and pretty clean:
```
rlxboot# printenv
=3
addmisc=setenv bootargs ${bootargs}console=ttyS0,${baudrate}panic=1
baudrate=57600
bootaddr=(0xBC000000 + 0x1e0000)
bootargs=console=ttyS1,57600 root=/dev/mtdblock8 rts_hconf.hconf_mtd_idx=0 mtdparts=m25p80:256k(boot),128k(pib),1024k(userdata),128k(db),128k(log),128k(dbbackup),128k(logbackup),3072k(kernel),11264k(rootfs)
bootcmd=bootm 0xbc1e0000
bootfile=/vmlinux.img
ethact=r8168#0
ethaddr=00:00:00:00:00:00
load=tftp 80500000 ${u-boot}
loadaddr=0x82000000
stderr=serial
stdin=serial
stdout=serial
Environment size: 533/131068 bytes
```
So we can get ourselves a root shell:
```
rlxboot# setenv bootargs ${bootargs} init=/bin/sh
rlxboot# ${bootcmd}
```
Nothing is mounted or started since /sbin/init is skipped altogether
in this case. Not even /sys and /proc. We can emulate a semi-normal
system by running
`/etc/rc.d/rcS`
as the first command. And then run for example
`telnetd -l /bin/sh`
to enable temporary passwordless telnet into the camera instead of/in
addition to the serial console. This is futile unless you have
networking of course. I will not go into details on how to do that
from the shell. Use the much simpler Bluetooth procedure described
above. Or the "mydlink" app if you prefer.
### OEM boot log
```
U-Boot 2014.01-rc2-V1.1 (Jun 06 2018 - 03:44:37)
rx5281 prid=0xdc02
DRAM: 64 MiB @ 800 MHz
Skipping flash_init
Flash: 0 Bytes
flash status is 0, 2, 0
SF: Detected W25Q128FV with page size 256 Bytes, erase size 64 KiB, total 16 MiB
Using default environment
In: serial
Out: serial
Err: serial
Net: Realtek PCIe GBE Family Controller mcfg = 0024
no hw config header
new_ethaddr = 00:00:00:00:00:00
r8168#0
no hw config header
Press ESC to abort autoboot in 3 seconds## Booting kernel from Legacy Image at bc1e0000 ...
get header OKimage_get_kernel check hcrc
image_get_kernel print contents
Image Name: linux_3.10
Created: 2018-06-05 19:44:27 UTC
Image Type: MIPS Linux Kernel Image (uncompressed)
Data Size: 1662157 Bytes = 1.6 MiB
Load Address: 804d4960
Entry Point: 804d4960
Verifying Checksum ... OK
Loading Kernel Image ... OK
Starting kernel ...
Linux version 3.10.27 (jenkins@DMdssdFW1) (gcc version 4.8.5 20150209 (prerelease) (Realtek RSDK-4.8.5p1 Build 2278) ) #1 PREEMPT Wed Jun 6 03:36:32 CST 2018
prom cpufreq = 500000000
prom memsize = 67108864
hw_ver: 0x1, hw_rev: 0x2, isp_ver: 0x0
bootconsole [early0] enabled
CPU revision is: 0000dc02
Determined physical RAM map:
memory: 04000000 @ 00000000 (usable)
Reserved contiguous memory at 0x4f3000
Zone ranges:
Normal [mem 0x00000000-0x03ffffff]
Movable zone start for each node
Early memory node ranges
node 0: [mem 0x00000000-0x03ffffff]
icache: 32kB/32B, dcache: 16kB/32B, scache: 0kB/0B
Built 1 zonelists in Zone order, mobility grouping on. Total pages: 16256
Kernel command line: console=ttyS1,57600 root=/dev/mtdblock8 rts_hconf.hconf_mtd_idx=0 mtdparts=m25p80:256k(boot),128k(pib),1024k(userdata),128k(db),128k(log),128k(dbbackup),128k(logbackup),3072k(kernel),11264k(rootfs)
PID hash table entries: 256 (order: -2, 1024 bytes)
Dentry cache hash table entries: 8192 (order: 3, 32768 bytes)
Inode-cache hash table entries: 4096 (order: 2, 16384 bytes)
Memory: 48600k/65536k available (3844k kernel code, 16936k reserved, 888k data, 192k init, 0k highmem)
SLUB: HWalign=32, Order=0-3, MinObjects=0, CPUs=1, Nodes=1
Preemptible hierarchical RCU implementation.
NR_IRQS:49
Calibrating delay loop... 498.89 BogoMIPS (lpj=2494464)
pid_max: default: 32768 minimum: 301
Mount-cache hash table entries: 512
pinctrl core: initialized pinctrl subsystem
regulator-dummy: no parameters
NET: Registered protocol family 16
rtsxb2 registered with IRQs
INFO: initializing USB host ...
INFO: initializing spi host ...0
spi platform id is 0
INFO: initializing I2C master ...
INFO: initializing DMA controller ...
INFO: initializing SD controller ...
INFO: initializing snd device ...
snd resvd mem size : 1048576
INFO: initializing pinctrl device ...
pinctrl_platform pinctrl_platform: rtspc registered with IRQs
INFO: initializing ethernet devices ...
INFO: initializing dwc_otg devices ...
INFO: initializing USB phy ...
INFO: initializing ISP device ...
isp resvd mem addr : 0x005f3000, size : 0xa00000
ISP camera platform devices added
INFO: initializing watchdog controller ...
INFO: initializing PWM controller ...
INFO: initializing crypto device ...
INFO: initializing pmu device ...
bio: create slab at 0
rts_dmac rts_dmac: DesignWare DMA Controller, 1 channels
INFO: realtek DMA engine inited
SCSI subsystem initialized
spic-platform spic-platform.0: master is unqueued, this is deprecated
INFO:allocate spi master 0, 0
usbcore: registered new interface driver usbfs
usbcore: registered new interface driver hub
usbcore: registered new device driver usb
usbphy-platform usbphy-platform: Initialized Realtek IPCam USB Phy module
Linux video capture interface: v2.00
Advanced Linux Sound Architecture Driver Initialized.
Bluetooth: Core ver 2.16
NET: Registered protocol family 31
Bluetooth: HCI device and connection manager initialized
Bluetooth: HCI socket layer initialized
Bluetooth: L2CAP socket layer initialized
Bluetooth: SCO socket layer initialized
NET: Registered protocol family 2
TCP established hash table entries: 512 (order: 0, 4096 bytes)
TCP bind hash table entries: 512 (order: -1, 2048 bytes)
TCP: Hash tables configured (established 512 bind 512)
TCP: reno registered
UDP hash table entries: 256 (order: 0, 4096 bytes)
UDP-Lite hash table entries: 256 (order: 0, 4096 bytes)
NET: Registered protocol family 1
RPC: Registered named UNIX socket transport module.
RPC: Registered udp transport module.
RPC: Registered tcp transport module.
RPC: Registered tcp NFSv4.1 backchannel transport module.
squashfs: version 4.0 (2009/01/31) Phillip Lougher
NFS: Registering the id_resolver key type
Key type id_resolver registered
Key type id_legacy registered
jffs2: version 2.2. (NAND) © 2001-2006 Red Hat, Inc.
msgmni has been set to 94
NET: Registered protocol family 38
Block layer SCSI generic (bsg) driver version 0.4 loaded (major 253)
io scheduler noop registered
io scheduler deadline registered
io scheduler cfq registered (default)
Serial: 8250/16550 driver, 3 ports, IRQ sharing disabled
serial8250: ttyS0 at MMIO 0x18810000 (irq = 6) is a 16550A
console [ttyS1] enabled, bootconsole disabled
console [ttyS1] enabled, bootconsole disabled
serial8250: ttyS1 at MMIO 0x18810100 (irq = 6) is a 16550A
serial8250: ttyS2 at MMIO 0x18810200 (irq = 6) is a 16550A
dbg_iomem initialized!
m25p80 spi0.0: unrecognized id mx25l12845e
m25p80 spi0.0: found w25q128fv, expected m25p80
m25p80 spi0.0: w25q128fv (16384 Kbytes)
9 cmdlinepart partitions found on MTD device m25p80
Creating 9 MTD partitions on "m25p80":
0x000000000000-0x000000040000 : "boot"
0x000000040000-0x000000060000 : "pib"
0x000000060000-0x000000160000 : "userdata"
0x000000160000-0x000000180000 : "db"
0x000000180000-0x0000001a0000 : "log"
0x0000001a0000-0x0000001c0000 : "dbbackup"
0x0000001c0000-0x0000001e0000 : "logbackup"
0x0000001e0000-0x0000004e0000 : "kernel"
0x0000004e0000-0x000000fe0000 : "rootfs"
invalid hconf_mtd_idx!
hconf init failed
rtl8168 Gigabit Ethernet driver 8.038.00-NAPI loaded
rtl8168 rtl8168 (unregistered net_device): Get invalid MAC address from flash!
eth%d: 0xb8400000, 00:00:00:00:00:00, IRQ 10
PPP generic driver version 2.4.2
PPP MPPE Compression module registered
NET: Registered protocol family 24
ehci_hcd: USB 2.0 'Enhanced' Host Controller (EHCI) Driver
ehci-rts: ehci-rts platform driver
ehci-platform ehci-platform: EHCI Host Controller
ehci-platform ehci-platform: new USB bus registered, assigned bus number 1
ehci-platform ehci-platform: irq 11, io mem 0x18100000
ehci-platform ehci-platform: USB 2.0 started, EHCI 1.00
usb usb1: New USB device found, idVendor=1d6b, idProduct=0002
usb usb1: New USB device strings: Mfr=3, Product=2, SerialNumber=1
usb usb1: Product: EHCI Host Controller
usb usb1: Manufacturer: Linux 3.10.27 ehci_hcd
usb usb1: SerialNumber: ehci-platform
hub 1-0:1.0: USB hub found
hub 1-0:1.0: 1 port detected
ohci_hcd: USB 1.1 'Open' Host Controller (OHCI) Driver
ohci-platform ohci-platform: Generic Platform OHCI Controller
ohci-platform ohci-platform: new USB bus registered, assigned bus number 2
ohci-platform ohci-platform: irq 11, io mem 0x18180000
usb usb2: New USB device found, idVendor=1d6b, idProduct=0001
usb usb2: New USB device strings: Mfr=3, Product=2, SerialNumber=1
usb usb2: Product: Generic Platform OHCI Controller
usb usb2: Manufacturer: Linux 3.10.27 ohci_hcd
usb usb2: SerialNumber: ohci-platform
hub 2-0:1.0: USB hub found
hub 2-0:1.0: 1 port detected
dwc_otg: version 3.10b 20-MAY-2013
Core Release: 3.10a
Setting default values for core params
WARN::dwc_otg_set_param_dev_tx_fifo_size:6354: Value is larger then power-on FIFO size
WARN::dwc_otg_set_param_dev_tx_fifo_size:6354: Value is larger then power-on FIFO size
Using Buffer DMA mode
Periodic Transfer Interrupt Enhancement - disabled
Multiprocessor Interrupt Enhancement - disabled
OTG VER PARAM: 0, OTG VER FLAG: 0
Shared Tx FIFO mode
usbcore: registered new interface driver usb-storage
g_mass_storage gadget: Mass Storage Function, version: 2009/09/11
g_mass_storage gadget: Number of LUNs=1
lun0: LUN: removable file: (no medium)
g_mass_storage gadget: Mass Storage Gadget, version: 2009/09/11
g_mass_storage gadget: g_mass_storage ready
usb device pull 1
i2c /dev entries driver
Unable to read RTP_REG_CHIP_VERSION reg
rtp_mfd 0-0030: pre_init() failed: -140
rtp_mfd: probe of 0-0030 failed with error -140
Stopped watchdog timer
timer margin: 8 sec
nf_conntrack version 0.5.0 (759 buckets, 3036 max)
ip_tables: (C) 2000-2006 Netfilter Core Team
TCP: cubic registered
NET: Registered protocol family 17
Bluetooth: RFCOMM TTY layer initialized
Bluetooth: RFCOMM socket layer initialized
usb 1-1: new high-speed USB device number 2 using ehci-platform
Bluetooth: RFCOMM ver 1.11
Bluetooth: BNEP (Ethernet Emulation) ver 1.3
Bluetooth: BNEP filters: protocol multicast
Bluetooth: BNEP socket layer initialized
Key type dns_resolver registered
ALSA device list:
No soundcards found.
VFS: Mounted root (squashfs filesystem) readonly on device 31:8.
Freeing unused kernel memory: 192K (804b0000 - 804e0000)
usb 1-1: New USB device found, idVendor=0bda, idProduct=b720
usb 1-1: New USB device strings: Mfr=1, Product=2, SerialNumber=3
usb 1-1: Product: 802.11n WLAN Adapter
usb 1-1: Manufacturer: Realtek
usb 1-1: SerialNumber: 00e04c000001
init started: BusyBox v1.22.1 (2018-06-06 03:10:44 CST)
starting pid 54, tty '': '/etc/rc.d/rcS start'
mount: mounting none on /proc/bus/usb failed: No such file or directory
rm: can't remove '/dev/mtd9': No such file or directory
mknod: /dev/console: File exists
soc-audio soc-audio.0: ASoC: machine RLX_INTERN_CARD should use snd_soc_register_card()
soc-audio soc-audio.0: rlx-codec-digital <-> pcm-platform mapping ok
soc-audio soc-audio.0: rlx-codec-analog <-> pcm-platform mapping ok
pinctrl_platform pinctrl_platform: request() failed for pin 0
pinctrl_platform pinctrl_platform: pin-0 (pinctrl-rts:0) status -16
request GPIO failed
sd-platform: probe of rts3901-sdhc failed with error -16
rtscam:rtscam_soc_probe
rtscam:rtscam_hx280_probe
rtscam:hx280enc:HW at base <0x18060000> with ID <0x48314810>
rtscam:rtscam_jpgenc_probe
rtscam:rtstream_init
rtscam:begin to load fw from isp.fw
rtscam:Load firmware size : 131072.
rtscam:Found ISP 1.006 device
rtscam:video device registered
rtscam:rts3901-isp initialized
Setup db... ok.
Startting dbd... Password for 'root' changed
ok.
set the date to default:
Wed Jun 6 00:00:00 UTC 2018
No SD Device Path Exists.
rc.sysinit start ok.
============ normal mode ===============
dbd(181) is already running.
Startting tz_dst... ok.
setsystz ok
Startting watchDog... ok.
Startting avcd...
mic vol = 80
avcd ok.
starting create_certificate...get server.pem... ok.
Startting dbus-daemon... ok.
Startting bluetoothd... sendCmd : 0
Open /tmp/ap_list fail: No such file or directory
main[283] Fail to get channel of Kjellerbod network
configure :
Wireless : essid: Kjellerbod, encryp_method: AES, auth_method: WPA2PSK
Network : dhcp_enable: 1, hostname: DCS-8000LH
Open /proc/sys/net/ipv6/conf/wlan0/autoconf fail: No such file or directory
killall: rtspd: no process killed
killall: udhcpc: no process killed
killall: wifiAutoReconnect: no process killed
sendCmd : 0
sendCmd : 0
/bin/sh: dibbler-client: not found
killall: orthrus: no process killed
killall: orthrusipv6: no process killed
killall: pppd: no process killed
killall: zcip: no process killed
wlan1 MAC [b2:c5:54:4c:cc:73]
23186 wpa_supplicant -B -c /tmp/wpa_supplicant.conf -i wlan0 -P /tmp/wpa_supplicant.pid
rfkill: Cannot open RFKILL control device
ioctl[SIOCSIWAP]: Operation not permitted
udhcpc (v1.22.1) started
/sbin/udhcpc.sh: line 1: /etc/rc.d/init.d/zcip.sh: not found
Sending discover...
Sending discover...
Sending select for 192.168.2.37...
Lease of 192.168.2.37 obtained, lease time 432000
ifdown: interface wlan1 not configured
cat: can't open '/tmp/wifi-led.pid': No such file or directory
sh: you need to specify whom to kill
deleting routers
route: ioctl 0x890c failed: No such process
adding dns 148.122.16.253
adding dns 148.122.164.253
start network services, ...
Startting mDNSResponder... ok.
Starting rtspd... ok.
Startting ntpd... disabled.
Startting firewall...ok.
/etc/rc.d/rcS: /etc/rc.d/rcS.d/S24network.sh: line 5: /etc/rc.d/init.d/network_services_ipv6.sh: not found
Starting Apple Darwin Multicast DNS / DNS Service Discovery daemon: mdnsd.
Jun 6 02:00:32 mDNSResponder: mDNSResponder (Engineering Build) (Jun 6 2018 03:55:36) starting
Jun 6 02:00:32 mDNSResponder: mDNS_AddDNSServer: Lock not held! mDNS_busy (0) mDNS_reentrancy (0)
Jun 6 02:00:32 mDNSResponder: mDNS_AddDNSServer: Lock not held! mDNS_busy (0) mDNS_reentrancy (0)
Jun 6 02:00:32 mDNSResponder: WARNING: mdnsd continuing as root because user "nobody" does not exist
Startting ntpd... disabled.
Startting db_analysis... ok.
Startting firewall...ok.
rtspd(1011 878) is already running.
Startting myDlinkEvent... ok.
2018-06-06 02:00:37 | INFO | tcp_listen | 176| listening 127.0.0.1:7000
2018-06-06 02:00:37 | INFO | http_listen | 40| waiting new connections ...
rc.local start ok.
starting pid 1157, tty '': '/bin/busybox getty -L ttyS1 57600 vt100'
localhost login: May 6 22:34:35 mDNSResponder: mDNS_Execute: mDNSPlatformRawTime went backwards by 438780374 ticks; setting correction factor to -1542198966
May 6 22:34:37 mDNSResponderPosix: mDNSCoreReceive: mDNSPlatformRawTime went backwards by 438777274 ticks; setting correction factor to 1206127822
```
### Partitions
The D-Link DCS-8000LH partitions are:
```
# cat /proc/mtd
dev: size erasesize name
mtd0: 00040000 00010000 "boot"
mtd1: 00020000 00010000 "pib"
mtd2: 00100000 00010000 "userdata"
mtd3: 00020000 00010000 "db"
mtd4: 00020000 00010000 "log"
mtd5: 00020000 00010000 "dbbackup"
mtd6: 00020000 00010000 "logbackup"
mtd7: 00300000 00010000 "kernel"
mtd8: 00b00000 00010000 "rootfs"
```
Or as seen by the driver with start and end addresses:
```
9 cmdlinepart partitions found on MTD device m25p80
Creating 9 MTD partitions on "m25p80":
0x000000000000-0x000000040000 : "boot"
0x000000040000-0x000000060000 : "pib"
0x000000060000-0x000000160000 : "userdata"
0x000000160000-0x000000180000 : "db"
0x000000180000-0x0000001a0000 : "log"
0x0000001a0000-0x0000001c0000 : "dbbackup"
0x0000001c0000-0x0000001e0000 : "logbackup"
0x0000001e0000-0x0000004e0000 : "kernel"
0x0000004e0000-0x000000fe0000 : "rootfs"
```
Partition usage:
| number | name | start | end | size | fstype | contents |
| ------ | ----------- | -------- | -------- | -------- | -------- | --------------- |
| 0 | "boot" | 0x000000 | 0x040000 | 0x40000 | boot | U-Boot |
| 1 | "pib" | 0x040000 | 0x060000 | 0x20000 | raw | device info |
| 2 | "userdata" | 0x060000 | 0x160000 | 0x100000 | squashfs | mydlink (/opt) |
| 3 | "db" | 0x160000 | 0x180000 | 0x20000 | tar.gz | non-volatile data |
| 4 | "log" | 0x180000 | 0x1a0000 | 0x20000 | raw? | empty |
| 5 | "dbbackup" | 0x1a0000 | 0x1c0000 | 0x20000 | tar.gz | copy of "db" |
| 6 | "logbackup" | 0x1c0000 | 0x1e0000 | 0x20000 | raw? | empty |
| 7 | "kernel" | 0x1e0000 | 0x4e0000 | 0x300000 | uImage | Linux 3.10 |
| 8 | "rootfs" | 0x4e0000 | 0xfe0000 | 0xb00000 | squashfs | rootfs (/) |
The D-Link firmware updates I have looked at will replace the
"userdata", "kernel" and "rootfs" partitions, but leave other
partitions unchanged. I imagine that the "boot" partition might be
upgraded too if deemed necessary by D-Link. But it was not touched
when going from 2.01.03 to 2.02.02.
The "log" and "logbackup" appear to be currently unused. But I am
reluctant trusting this, given their names. I guess they could be
cleaned and overwritten anytime. They are too small to be very useful
anyway. You can't put any writable file system om them with only two
erase blocks.
### Backing up dynamic data
This is not necessary for system operation as any non-volatile data is
saved in the [**db**](#Partitions) partition anyway. But it can still be useful to
have a copy of the system state for offline studying, so I also like
to save a working copy of /tmp:
```
tar zcvf /tmp/tmp.tgz /tmp/
tftp -l /tmp/tmp.tgz -r tmp.tgz -p 192.168.2.1
```
### Why can we run the NIPCA webserver before we modify the firmware?
D-Link left all the webserver parts in the firmware, including all the
NIPCA CGI tools. The only change they made was disabling the startup
script.
The webserver can be enabled and started manually from the shell by
running:
```
tdb set HTTPServer Enable_byte=1
/etc/rc.d/init.d/extra_lighttpd.sh start
```
This is precisely what our Bluetooth tool does when it is called with
the **--lighttpd** option.
The `HTTPServer Enable_byte` is persistent, so setting is only
necessary once. Unless you do a factory reset.
### What's the problem with the RTSP server in the unmodified firmware?
The original D-Link firmware is already running **rtspd**, but it is only
listening on the loopback address 127.0.0.1. It is probably intended
as a backend server for the **mydlink** services.
We can make rtspd listen on all addresses by clearing the **RTPServer
RejectExtIP** setting. Both rtspd and the firewall need a restart for
this to have an effect. Enabling **RTPServer Authenticate** is
probably a good idea when doing this, to prevent the camera from
streaming to anyone who can connect.
```
tdb set RTPServer RejectExtIP_byte=0
tdb set RTPServer Authenticate_byte=1
/etc/rc.d/init.d/firewall.sh reload
/etc/rc.d/init.d/rtspd.sh restart
```
These settings are persistent as usual, so they only need to be
modified after factory resets. Changing the settings and then
rebooting the camera will therefore enable remote RTSP access, since
both services are running by default in the D-Link firmware.
### The "userdata" file system
The [**userdata**](#Partitions) you backed up as **mtd2** contains a xz compressed
squasfs file system, with most of the mydlink cloud tools. The file
system can be unpacked on a Linux system using unsquashfs:
```
$ unsquashfs mtd2
Parallel unsquashfs: Using 4 processors
15 inodes (22 blocks) to write
[=============================================================================================================================================================================================================|] 22/22 100%
created 12 files
created 1 directories
created 3 symlinks
created 0 devices
created 0 fifos
$ ls -la squashfs-root/
total 1156
drwxr-xr-x 2 bjorn bjorn 340 Feb 14 10:58 .
drwxrwxrwt 41 root root 2280 May 13 15:13 ..
-rwxr-xr-x 1 bjorn bjorn 13184 Feb 14 10:58 ca-refresh
-rwxr-xr-x 1 bjorn bjorn 273692 Feb 14 10:58 cda
lrwxrwxrwx 1 bjorn bjorn 9 May 13 15:13 cert -> /tmp/cert
-rwxr-xr-x 1 bjorn bjorn 5991 Feb 14 10:58 client-ca.crt.pem
lrwxrwxrwx 1 bjorn bjorn 7 May 13 15:13 config -> /tmp/db
-rwxr-xr-x 1 bjorn bjorn 436428 Feb 14 10:58 da_adaptor
-rwxr-xr-x 1 bjorn bjorn 4 Feb 14 10:58 dcp_version
-rwxr-xr-x 1 bjorn bjorn 814 Feb 14 10:58 device.cfg
lrwxrwxrwx 1 bjorn bjorn 17 May 13 15:13 lib -> /var/libevent/lib
-rwxr-xr-x 1 bjorn bjorn 5 Feb 14 10:58 m2m
-rwxr-xr-x 1 bjorn bjorn 6220 Feb 14 10:58 mydlink_watchdog.sh
-rwxr-xr-x 1 bjorn bjorn 1034 Feb 14 10:58 opt.local
-rwxr-xr-x 1 bjorn bjorn 171828 Feb 14 10:58 sa
-rwxr-xr-x 1 bjorn bjorn 242028 Feb 14 10:58 strmsvr
-rwxr-xr-x 1 bjorn bjorn 10 Feb 14 10:58 version
```
The primary entry point here is the **opt.local** init-script. This
is also the only required file. The **version** file is read by the
Bluetooth API, and reported as the mydlink version, which makes it
useful for verifying a modified camera. Our alternate
[**userdata**](#Partitions) file system contains only these two
files. But one could imagine including a number of other useful tools,
like tcpdump, a ssh server etc.
It is also possible to keep all the D-Link files, if that's
wanted. The original **opt.local** script can be modified to leave
mydlink support running while still starting other features. We could
even add our own non-volatile setting to choose one or the other, or
both, and making it a configuration thing. Fantasy is the only
limiting factor.
Repacking the files into a camera compatible squashfs file system:
```
mksquashfs squashfs-root mtd2.new -all-root -comp xz
```
Note that **xz** compression is required. No other compression is
supported AFAIK.
There are simpler ways to write the new file system to the camera than
creating a firmware update package, if you just want to test it. One
example:
```
tftp -r mtd2.new -l /tmp/mtd2.new -g 192.168.2.1
cat /tmp/mtd2.new >/dev/mtdblock2
```
But DON'T do that unless you both have a backup and know what you are
doing...
You should reboot the camera after doing this, unless you make sure
you stop any process running from the previous /opt system and remount
it properly.
### Using NIPCA to manage the camera
The local web server provides a direct camera management API, but not
a web GUI application. All API requests require authentication. We
have added a single admin user, using the pincode from the camera
label as passord. More users can be adding if necessary, even by
using the API itself.
Read the NIPCA reference spec for usage, or look at the script names
under **/var/www** in the [**rootfs**](#Partitions) and simply try
them out. Most API endpoints return a list of current settings. Some
of the settings can be set by GET requests by providing the new values
as URL parameters.
A few NIPCA references of different age:
* http://gurau-audibert.hd.free.fr/josdblog/wp-content/uploads/2013/09/CGI_2121.pdf
* https://docplayer.net/33354138-Network-ip-camera-application-programming-interface-nipca.html
* ftp://ftp.dlink.net.pl/dcs/dcs-2132L/documentation/DCS-2132L_NIPCA_support table_1-9-5_20131211.pdf
* https://www.airlivecam.eu/data/IP%20Camera%20Open%20API.doc
Google for more. Be aware that a most of these settings depend on the
hardware. There is obviously no point in trying to manage an SD card
slot of the DCS-8000LH...
A few of examples, using curl to read and set configuration variables:
```
$ curl -u admin:123456 http://192.168.2.37/common/info.cgi
model=DCS-8000LH
product=Wireless Internet Camera
brand=D-Link
version=2.02
build=02
hw_version=A
nipca=1.9.7
name=DCS-8000LH
location=
macaddr=B0:C5:54:AA:BB:CC
ipaddr=192.168.2.37
netmask=255.255.255.0
gateway=192.168.2.1
wireless=yes
inputs=0
outputs=0
speaker=no
videoout=no
pir=no
icr=yes
ir=yes
mic=yes
led=no
td=no
playing_music=no
whitelightled=no
$ curl -u admin:123456 'http://192.168.2.37/config/datetime.cgi'
method=1
timeserver=ntp1.dlink.com
timezone=1
utcdate=2019-05-09
utctime=13:25:14
date=2019-05-09
time=15:25:14
dstenable=yes
dstauto=yes
offset=01:00
starttime=3.2.0/02:00:00
stoptime=11.1.0/02:00:00
$ curl -u admin:123456 http://192.168.2.37/config/led.cgi?led=off
led=off
```
Most camera settings can be controlled using this API and e.g curl for
the command line. There are also packages implementing API clients,
like for example this nodejs one: https://www.npmjs.com/package/nipca
### Bluetooth LE GATT API
The Bluetooth service is in a "locked" mode by default. This is
controlled by the "Ble Mode" persistent setting stored in the **db**
partition. If true ("1"), then most of the Bluetooth commands are
rejected. But changing the setting manually will not help much, since
the system automatically enter lock mode 180 seconds after the last
Bluetooth client disconnected.
The challenge -> response unlock method described below is much more
useful.
#### Converting the PIN Code to a Bluetooth unlock key
Most Bluetooth commands are rejected when locked. Access to the full
Bluetooth API can be unlocked by using the PIN Code printed on the
camera label. This code is not sent directly over the air
though. Instead it is combined with a random challenge.
Both the random challenge and the matching key are generated by the
application `sbin/gen_bt_config` on the camera side. The key is
calculated by taking the first 16 bytes of the base64 encoded md5
digest of
* model string + '-' four last mac digits (or Bluetooth device name?)
* PIN Code
* challenge.
Note that this application depends on bluetooth libraries, which are
not in /lib. So we have to set LD\_LIBRARY\_PATH to run it manually:
```
# LD_LIBRARY_PATH=/var/bluetooth/lib sbin/gen_bt_config update_key_only
In main:182: modelStr = 'DCS-8000LH'
In main:183: mac = 'b0:c5:54:ab:cd:ef'
In update_ble_key:87: key data = 'DCS-8000LH-CDEF012345b2gaescrbldchnik'
```
I've slightly obfuscated my data here - the pincode in the above case
is `012345`, and the dynamically generated challenge is
`b2gaescrbldchnik`. The generated challenge and key are stored in
`/tmp/db/db.xml` and can be read directly from there:
```
# grep Key /tmp/db/db.xml |tail -2
```
Or you can read them using the same tools the Bluetooth system uses:
```
# tdb get Ble ChallengeKey_ss
b2gaescrbldchnik
# mdb get ble_key
jrtY6nONQ5rV+2Ph
```
Yes, the D-Link code does actually use tdb for the first one and mdb
for the second. I have absolutely no idea why,... It is possible to
read the key using tdb too:
```
# tdb get Ble Key_ss
jrtY6nONQ5rV+2Ph
```
Generating the same key by hand on a Linux system is simple:
```
$ echo -n 'DCS-8000LH-CDEF012345b2gaescrbldchnik' | md5sum | xxd -r -p | base64 | cut -c-16
jrtY6nONQ5rV+2Ph
```
#### Characteristic UUIDs
D-Link is using the GATT BlueZ example plugin, patching it to add
their camera specific endpoints. This means that we can find all the
API "documentation" in the
`DCS-8000LH-GPL/package/bluez_utils/feature-patch/5.28/customized-mydlink.patch`
file in the GPL archive.
This defines a number of 16bit UUIDs with mostly nonsense names:
```
+#define IPCAM_UUID 0xD001
+#define A000_UUID 0xA000
+#define A001_UUID 0xA001
+#define A100_UUID 0xA100
+#define A101_UUID 0xA101
+#define A102_UUID 0xA102
+#define A103_UUID 0xA103
+#define A104_UUID 0xA104
+#define A200_UUID 0xA200
+#define A201_UUID 0xA201
+#define A300_UUID 0xA300
+#define A301_UUID 0xA301
+#define A302_UUID 0xA302
+#define A303_UUID 0xA303
+#define A304_UUID 0xA304
```
`IPCAM_UUID` is registered as the `GATT_PRIM_SVC_UUID`, which means
that it shows up as a primary GATT service we can look for when
looking for a supported camera.
The rest of the UUIDs are characteristics of this primary service. The
API is based on reading or writing these characteristics.
#### Data formatting
Both input and output parameters are sent as ascii strings using
key=value pairs joined by `;`, with an exception for the nested KV
pairs in the WiFi survey results. All keys are single upper case
characters. Key names are somewhat reused, so the exact meaning depend
on the characteristic.
Values are either integers, including boolean 0/1, or some set of
ascii text.
Three real examples, read from 0xA001, 0xA200 and 0xA104:
```
M=1;C=b2gaescrbldchnik
N=DCS-8000LH;P=1;T=1557349762;Z=CET-1CEST,M3.5.0,M10.5.0/3;F=2.01.03;H=A1;M=B0C554ABCDEF;V=3.0.0-b71
I=192.168.2.37;N=255.255.255.0;G=192.168.2.1;D=148.122.16.253
```
#### Listing characteristics
The **gattool** Linux command line tool is useful for exploring
Bluetooth LE devices. You can look for primary services and list
associated characteristics of a service:
```
[B0:C5:54:AA:BB:CC][LE]> primary
attr handle: 0x0001, end grp handle: 0x0008 uuid: 00001800-0000-1000-8000-00805f9b34fb
attr handle: 0x0010, end grp handle: 0x0010 uuid: 00001801-0000-1000-8000-00805f9b34fb
attr handle: 0x0011, end grp handle: 0x002e uuid: 0000d001-0000-1000-8000-00805f9b34fb
[B0:C5:54:AA:BB:CC][LE]> characteristics 0x0011
handle: 0x0012, char properties: 0x12, char value handle: 0x0013, uuid: 0000a000-0000-1000-8000-00805f9b34fb
handle: 0x0015, char properties: 0x0a, char value handle: 0x0016, uuid: 0000a001-0000-1000-8000-00805f9b34fb
handle: 0x0017, char properties: 0x02, char value handle: 0x0018, uuid: 0000a100-0000-1000-8000-00805f9b34fb
handle: 0x0019, char properties: 0x0a, char value handle: 0x001a, uuid: 0000a101-0000-1000-8000-00805f9b34fb
handle: 0x001b, char properties: 0x08, char value handle: 0x001c, uuid: 0000a102-0000-1000-8000-00805f9b34fb
handle: 0x001d, char properties: 0x02, char value handle: 0x001e, uuid: 0000a103-0000-1000-8000-00805f9b34fb
handle: 0x001f, char properties: 0x02, char value handle: 0x0020, uuid: 0000a104-0000-1000-8000-00805f9b34fb
handle: 0x0021, char properties: 0x0a, char value handle: 0x0022, uuid: 0000a200-0000-1000-8000-00805f9b34fb
handle: 0x0023, char properties: 0x08, char value handle: 0x0024, uuid: 0000a201-0000-1000-8000-00805f9b34fb
handle: 0x0025, char properties: 0x0a, char value handle: 0x0026, uuid: 0000a300-0000-1000-8000-00805f9b34fb
handle: 0x0027, char properties: 0x02, char value handle: 0x0028, uuid: 0000a301-0000-1000-8000-00805f9b34fb
handle: 0x0029, char properties: 0x08, char value handle: 0x002a, uuid: 0000a302-0000-1000-8000-00805f9b34fb
handle: 0x002b, char properties: 0x08, char value handle: 0x002c, uuid: 0000a303-0000-1000-8000-00805f9b34fb
handle: 0x002d, char properties: 0x02, char value handle: 0x002e, uuid: 0000a304-0000-1000-8000-00805f9b34fb
```
It is also possible to read and write characteristics using this tool,
but this can be a bit cumbersome unless you are fluent in ASCII coding
;-)
#### The IPCam characteristics
Guessed meanings of each characteristic, based on the source code and
some trial and error. Not necessarily how D-Link would describe them:
| UUID | op | description | format | keys |
| ---- | ------ | --------------- | --------------------------------------- | --------------------------------------------------------------------------------------------------------------- |
| A000 | read | last status | C=%d;A=%d;R=%d | C: uuid, A: mode, R: state |
| A000 | notify | last status | C=%d;A=%d;R=%d | C: uuid, A: mode, R: state |
| A001 | read | challenge | M=%d;C=%s | M: opmode, C: challenge |
| A001 | write | auth | M=%d;K=%s | M: opmode, K: key |
| A100 | read | wifi survey | N=%d;P=%d;... | |
| A101 | read | wifi config | M=%s;I=%s;S=%s;E=%s | M: opmode, I: essid, S: 4 , E: 2 |
| A101 | write | wifi config | M=%s;I=%s;S=%s;E=%s;K=%s | M: opmode, I: essid, S: 4 , E: 2, K: password |
| A102 | write | wifi connect | C=%d | C: connect (0/1) |
| A103 | read | wifi status | S=%d | S: wifi link status (0,1,?) |
| A104 | read | ip config | I=%s;N=%s;G=%s;D=%s | I: address, N: netmask, G: gateway, D: DNS-server |
| A200 | read | system info | N=%s;P=%d;T=%d;Z=%s;F=%s;H=%s;M=%s;V=%s | N: devicename, P: haspin (0/1), T: time (unix epoch), Z: timezone, F: fwver, H: hwver, M: macaddr, V:mydlinkver |
| A200 | write | name and time | N=%s;T=%d;Z=%s | N: devicename, T: time (unix epoch), Z: timezone |
| A201 | write | admin password | P=%s;N=%s | P: current password, N: new password |
| A300 | read | reg state | G=%d | G: registration state (0/1) |
| A300 | write | reg state | G=%d | G: registration state (0/1) |
| A301 | read | provisioning | N=%s;T=%s;U=%s | N: username, T: footprint, U: portal |
| A302 | write | restart mydlink | C=%d | C: restart (0/1) |
| A303 | write | register | S=%s;M=%s | S: , M: (written to /tmp/mydlink/reg_info, and then kill -USR1 `pidof da_adaptor`) |
| A304 | read | register | S=%d;E=%d | S: , E: (cat /tmp/mydlink/reg_st) |
The UUIDs from 0xA300 to 0xA304 are all related to the mydlink cloud
service, and therefore not of much use to us. I haven't bothered
trying to figure out exactly how they are used.
We could in theory use the 0xA303 request which simply calls
**/opt/opt.local restart**. But with the gaping 0xA201 hole,
allowing **any** command, there isn't much need for this one...
A few more details on the more complex characteristics:
##### A000
The only characteristic sent as notifications. But it can also be
read directly for syncronous operations.
The value is the state to the last Bluetooth action:
"C=%d;A=%d;R=%d", last_action_status.uuid, last_action_status.mode, last_action_status.state
##### A100
The wifi survey scan results are split in 128 byte "pages", where each
page starts with the total number of pages and the current page
number. The characteristic value must be read as many times as the
given total.
For example, reading 3 pages:
```
[B0:C5:54:AA:BB:CC][LE]> char-read-hnd 0x0018
Characteristic value/descriptor: 4e 3d 33 3b 50 3d 31 3b 4c 3d 49 3d 41 6e 74 69 62 6f 6b 73 2c 4d 3d 30 2c 43 3d 36 2c 53 3d 34 2c 45 3d 32 2c 50 3d 36 32 26 4c 3d 49 3d 41 53 56 31 37 2c 4d 3d 30 2c 43 3d 31 31 2c 53 3d 34 2c 45 3d 32 2c 50 3d 34 36 26 4c 3d 49 3d 41 53 56 31 37 2d 64 6c 69 6e 6b 2c 4d 3d 30 2c 43 3d 36 2c 53 3d 34 2c 45 3d 32 2c 50 3d 36 38 26 4c 3d 49 3d 66 6a 6f 72 64 65 31 32 33 2c 4d 3d 30
[B0:C5:54:AA:BB:CC][LE]> char-read-hnd 0x0018
Characteristic value/descriptor: 4e 3d 33 3b 50 3d 32 3b 2c 43 3d 31 2c 53 3d 34 2c 45 3d 32 2c 50 3d 35 38 26 4c 3d 49 3d 4a 4f 4a 2c 4d 3d 30 2c 43 3d 31 31 2c 53 3d 34 2c 45 3d 32 2c 50 3d 34 37 26 4c 3d 49 3d 4b 6a 65 6c 6c 65 72 62 6f 64 2c 4d 3d 30 2c 43 3d 36 2c 53 3d 34 2c 45 3d 32 2c 50 3d 36 32 26 4c 3d 49 3d 6d 67 6d 74 2c 4d 3d 30 2c 43 3d 31 2c 53 3d 34 2c 45 3d 32 2c 50 3d 37 34 26 4c 3d 49 3d 52 69
[B0:C5:54:AA:BB:CC][LE]> char-read-hnd 0x0018
Characteristic value/descriptor: 4e 3d 33 3b 50 3d 33 3b 6e 64 65 64 61 6c 2c 4d 3d 30 2c 43 3d 31 31 2c 53 3d 34 2c 45 3d 32 2c 50 3d 36 32
```
These strings are decoded as:
```
N=3;P=1;L=I=Antiboks,M=0,C=6,S=4,E=2,P=62&L=I=ASV17,M=0,C=11,S=4,E=2,P=46&L=I=ASV17-dlink,M=0,C=6,S=4,E=2,P=68&L=I=fjorde123,M=0
N=3;P=2;,C=1,S=4,E=2,P=58&L=I=JOJ,M=0,C=11,S=4,E=2,P=47&L=I=Kjellerbod,M=0,C=6,S=4,E=2,P=62&L=I=mgmt,M=0,C=1,S=4,E=2,P=74&L=I=Ri
N=3;P=3;ndedal,M=0,C=11,S=4,E=2,P=62
```
Which, when joined after removing the N/P paging info, becomes::
```
L=I=Antiboks,M=0,C=6,S=4,E=2,P=62&L=I=ASV17,M=0,C=11,S=4,E=2,P=46&L=I=ASV17-dlink,M=0,C=6,S=4,E=2,P=68&L=I=fjorde123,M=0,C=1,S=4,E=2,P=58&L=I=JOJ,M=0,C=11,S=4,E=2,P=47&L=I=Kjellerbod,M=0,C=6,S=4,E=2,P=62&L=I=mgmt,M=0,C=1,S=4,E=2,P=74&L=I=Rindedal,M=0,C=11,S=4,E=2,P=62
```
And after splitting this on & we get the final result:
```
L=I=Antiboks,M=0,C=6,S=4,E=2,P=62
L=I=ASV17,M=0,C=11,S=4,E=2,P=46
L=I=ASV17-dlink,M=0,C=6,S=4,E=2,P=68
L=I=fjorde123,M=0,C=1,S=4,E=2,P=58
L=I=JOJ,M=0,C=11,S=4,E=2,P=47
L=I=Kjellerbod,M=0,C=6,S=4,E=2,P=62
L=I=mgmt,M=0,C=1,S=4,E=2,P=74
L=I=Rindedal,M=0,C=11,S=4,E=2,P=62
```
So each L entry is made up of the same set of keys:
* I: essid
* M: opmode? or authalg? (always 0 in the sample)
* C: channel (2.4 GHz only)
* S: key_mgmt/auth_alg/proto?
* E: key_mgmt/auth_alg/proto?
* P: relative signal. Higher is better. dBm + 100?
Still need to figure out the mapping of the M,S,E keys to
wpa_supplicant config settings. I assume they represent enums. But we
can simply treat them as opaque values since we only use the survey
data to help setup WiFi anyway. We copy these to the setup request,
and do not need to know what they mean.
FWIW, my example setting `M=0;I=Kjellerbod;S=4;E=2`
is mapped to this wpa_supplicant configuration:
```
# cat /tmp/wpa_supplicant.conf
ctrl_interface=/var/run/wpa_supplicant
device_type=4-0050F204-3
model_name=DCS-8000LH
manufacturer=D-Link
os_version=01020300
config_methods=push_button virtual_push_button
eapol_version=1
network={
scan_ssid=1
ssid="Kjellerbod"
key_mgmt=WPA-PSK
auth_alg=OPEN
proto=RSN
psk="redeacted"
}
```
##### A201
This write request allows setting an admin password, used for example
by the webserver. It takes the old and new passwords as unencoded
input, verifies that the old password matches, and then change the
admin password to the provided new one.
The initial password is empty, which prevents webserver
authentication. Simply provide an empty string for the old password in
the first request: **P=;N=newpassword**
But this request is much more useful in other ways.... The new passord
(N_str) is processed like this (after slight compression of the
interesting code lines):
```C
snprintf(cmd, sizeof(cmd), "mdb set admin_passwd %s", N_str);
snprintf(cmdbuf, sizeof(cmdbuf), "%s > %s 2>&1", cmd, p_name);
fp = popen(cmdbuf, "r");
```
You don't have to be a security expert to see the problem here. But
one mans bug is another mans feature :-)
##### A303
The two strings S and M are url decoded and checked for special
characters. Then the **orginal** url encoded strings are written to
**/tmp/mydlink/reg_info** and SIGUSR1 is sent to the **da_adaptor**
process. Presumably triggering it to reread the reg_info file.
It is pretty safe to assume that this provides some registration info
to the mydlink system, allowing it to connect to the cloud service.
The set of allowed characters is rather interesting:
```
"ABCDEFGHIJKLMNOPQRSTUVWXYZabcdefghijklmnopqrstuvwxyz0123456789 !\"#$%&'()*+,-./:;<=>?@[\\]^_`{|}~"
```
Which initially made me think that this was an obvious security hole,
since I missed the point that it's the url encoded strings that are
used on the command line.
But given the quality of the rest of the code here, I would be very
surprised if there isn't an issue or ten in the da_adaptor code
allowing this to be abused. It's just a bit harder to figure out
without the source code.
#### Manually restarting bluetoothd for debugging
It can be useful to run bluetoothd in the foreground when debugging
BLE interaction, or testing modified versions of bluetoothd. Log in
using telnet or serial and simply stop and restart bluetoothd with the
-d and -n options:
```
# /etc/rc.d/init.d/bluetoothd.sh stop
Stopping bluetoothd... ok.
# LD_LIBRARY_PATH=/var/bluetooth/lib /var/bluetooth/bin/bluetoothd -d -n -E -p "gatt,gatt_example"
bluetoothd[25020]: Bluetooth daemon 5.28
bluetoothd[25020]: src/main.c:parse_config() parsing main.conf
bluetoothd[25020]: src/main.c:parse_config() discovto=0
bluetoothd[25020]: src/main.c:parse_config() pairto=0
bluetoothd[25020]: src/main.c:parse_config() auto_to=3600
bluetoothd[25020]: src/main.c:parse_config() name=DCS-8000LH-CDEF
bluetoothd[25020]: src/main.c:parse_config() Key file does not have key 'Class'
bluetoothd[25020]: src/main.c:parse_config() Key file does not have key 'DeviceID'
bluetoothd[25020]: src/main.c:parse_config() Key file does not have key 'ReverseServiceDiscovery'
bluetoothd[25020]: src/main.c:parse_config() ControllerMode=le
bluetoothd[25020]: src/gatt.c:gatt_init() Starting GATT server
bluetoothd[25020]: src/adapter.c:adapter_init() sending read version command
bluetoothd[25020]: Starting SDP server
bluetoothd[25020]: src/sdpd-service.c:register_device_id() Adding device id record for 0002:1d6b:0246:051c
etc.
```
Note that the GATT GAP service will only pick up the device name
whenever it is set. This causes an empty Device Name characteristic
(0x2a00) after restarting bluetoothd.
The name must therefore be changed and set again after every
bluetoothd restart as a workaround:
```
/var/bluetooth/bin/hciconfig hci0 name foo
/var/bluetooth/bin/hciconfig hci0 name DCS-8000LH-CDEF
```
### Firmware updates
There are at least two shell scripts providing a firmware update
service in the D-Link firmware:
* /var/www/config/firmwareupgrade.cgi
* /sbin/fwupdate
They are both pretty similar and obviously come from the same source.
The main difference is that firmwareupgrade.cgi provides the NIPCA
firmwareupgrade service, while fwupdate is a command line tool.
The web service is most interesting for us, providing both the upload
and upgrade in one simple tool. The fwupdate tool is used by the
mydlink cloud tool **da_adaptor** , via an fw_upgrade symlink.
#### Downloading the latest OEM firmware
The mydlink tools will set up two URLs in `/tmp/db/device.cf`:
```
"FirmwareDaemonURL": "http://mp-eu-fwd.auto.mydlink.com:80/fw-upgrade",
"SecuredFirmwareDaemonURL": "https://mp-eu-fwd.auto.mydlink.com:443/fw-upgrade",
```
Calling either one of these with a model parameter will return a
download URL for the latest firmware version. Examples:
```
$ curl -D - http://mp-eu-fwd.auto.mydlink.com:80/fw-upgrade?model=DCS-8000LH
HTTP/1.1 200 OK
Date: Sun, 27 Oct 2019 16:27:24 GMT
Content-Length: 280
Etag: "9a475c16361db8ba3ebfe679554680dbb6bf2c38"
Content-Type: text/html; charset=UTF-8
Server: TornadoServer/5.1.1
{"code": 0, "fw_ver_type": "REGULAR", "process_time": 210, "main_board": {"url": "http://mydlinkmpfw.auto.mydlink.com/DCS-8000LH/DCS-8000LH_Ax_v2.03.02_3412.bin", "fw_version": "2.03.02", "md5": "3e26e96fcd8fcf711c1362a4cbfb2d48"}, "release_version": "3.2.7-b02", "device_id": ""}
```
```
$ curl -D - 'https://mp-eu-fwd.auto.mydlink.com:443/fw-upgrade?model=DCS-8100LH'
HTTP/1.1 200 OK
Date: Sun, 27 Oct 2019 16:35:39 GMT
Content-Length: 281
Etag: "5714f3e62ca04e5c3465705cb4c7356f1d50e54f"
Content-Type: text/html; charset=UTF-8
Server: TornadoServer/5.1.1
{"code": 0, "fw_ver_type": "REGULAR", "process_time": 210, "main_board": {"url": "https://mydlinkmpfw.auto.mydlink.com/DCS-8100LH/DCS-8100LH_Ax_v2.04.01_3619.bin", "fw_version": "2.04.01", "md5": "eb097a680754b94b81da6326b468121f"}, "release_version": "3.2.7-b03", "device_id": ""}
```
Download and verify the md5 sum:
```
$ curl -O https://mydlinkmpfw.auto.mydlink.com/DCS-8100LH/DCS-8100LH_Ax_v2.04.01_3619.bin
% Total % Received % Xferd Average Speed Time Time Time Current
Dload Upload Total Spent Left Speed
100 19.5M 100 19.5M 0 0 2457k 0 0:00:08 0:00:08 --:--:-- 2727k
$ md5sum DCS-8100LH_Ax_v2.04.01_3619.bin
eb097a680754b94b81da6326b468121f DCS-8100LH_Ax_v2.04.01_3619.bin
```
#### Signed and encrypted
Looking at the contents of a firmware update from D-Link can be
demotivating at the beginning:
```
$ tar xvf DCS-8000LH_Ax_v2.02.02_3014.bin
update.bin.aes
update.aes
aes.key.rsa
certificate.info
sign.sha1.rsa
$ file *
aes.key.rsa: data
certificate.info: ASCII text
sign.sha1.rsa: data
update.aes: data
update.bin.aes: data
$ ls -l
total 10956
-rw-r--r-- 1 bjorn bjorn 128 Feb 14 10:58 aes.key.rsa
-rw-r--r-- 1 bjorn bjorn 130 Feb 14 10:58 certificate.info
-rw-r--r-- 1 bjorn bjorn 128 Feb 14 10:58 sign.sha1.rsa
-rw-r--r-- 1 bjorn bjorn 10268368 Feb 14 10:58 update.aes
-rw-r--r-- 1 bjorn bjorn 936464 Feb 14 10:58 update.bin.aes
```
So all the interesting stuff is AES encrypted, and the AES key is RSA
encrypted. The only directly readable file is this one, and it
doesn't tell us much:
```
$ cat certificate.info
Publisher:DMdssdFW1
Supported Models:DCS-8000LH,DCS-8000LH
Firmware Version:1.0.0
Target:update.bin
Build No:3014
Contents:update
```
Not much we can do about this then. Or so it seems... Until we look
at **firmwareupgrade.cgi**, or **fwupdate** which has almost the same
code:
```sh
verifyFirmware() {
result=uploadSign
#tar tf "$UPLOADBIN" > /dev/null 2> /dev/null || return 1
fw_sign_verify.sh "$UPLOADBIN" /etc/db/verify.key > /dev/null 2> /dev/null || return 1
return 0
}
decryptFirmware() {
result=uploadDecrypt
pibinfo PriKey > $dir/decrypt.key 2> /dev/null
fw_decrypt.sh $dir/decrypt.key $out > /dev/null 2> /dev/null || return 1
return 0
}
```
Can it be that simple? Yes, it is.
Looking further at the **fw_sign_verify.sh** and **fw_decrypt.sh**,
used by both update tools, confirms it. The firmware is verified by
using the RSA public key in **/etc/db/verify.key** to decrypt the hash
in **sign.sha1.rsa**. Then it is decrypted using a key from the
factory data **pib** partition.
#### Further unpacking the firmware update
So we have the keys and the hashing algorithms we need to both verify
and decrypt this firmware. We can run the commands found in
**fw_decrypt.sh** to get the real contents (slightly adapted to modern
openssl versions):
```
$ openssl rsautl -decrypt -in aes.key.rsa -inkey decrypt.key -out aes.key
$ openssl aes-128-cbc -v -md md5 -kfile aes.key -nosalt -d -in update.bin.aes -out update.bin
bufsize=8192
*** WARNING : deprecated key derivation used.
Using -iter or -pbkdf2 would be better.
bytes read : 936464
bytes written: 936454
$ openssl aes-128-cbc -v -md md5 -kfile aes.key -nosalt -d -in update.aes -out update
bufsize=8192
*** WARNING : deprecated key derivation used.
Using -iter or -pbkdf2 would be better.
bytes read : 10268368
bytes written: 10268355
$ file update.bin update
update.bin: POSIX shell script, ASCII text executable
update: data
```
OK, the **update** file is still in an unknown format, but at least
we have the tool used to write it to the system. And it is a shell
script, so we have the source to look at too! But 936454 bytes is a
hell of a shell script, and this is of course because most of it is an
uuencoded binary. So we don't know exactly what that does. But it is
named ddPack so a fair guess is that it is a tool for dd'ing multiple
file systems or other images packed as a single file. That's really
enough info.
binwalk shows that the **update** file is just two squashfs systems
and a kernel, with a 1024 header of some sort. The header presumably
tells ddPack how it should apply these three images:
```
$ binwalk update
DECIMAL HEXADECIMAL DESCRIPTION
--------------------------------------------------------------------------------
1024 0x400 Squashfs filesystem, little endian, version 4.0, compression:xz, size: 338755 bytes, 16 inodes, blocksize: 131072 bytes, created: 2019-02-14 09:58:28
340992 0x53400 uImage header, header size: 64 bytes, header CRC: 0x675F081D, created: 2019-02-14 09:31:53, image size: 1661571 bytes, Data Address: 0x804D4960, Entry Point: 0x804D4960, data CRC: 0x73083021, OS: Linux, CPU: MIPS, image type: OS Kernel Image, compression type: none, image name: "linux_3.10"
2002627 0x1E8EC3 Squashfs filesystem, little endian, version 4.0, compression:xz, size: 8265620 bytes, 2145 inodes, blocksize: 131072 bytes, created: 2019-02-14 09:58:45
```
But we can easily guess that without knowing anything about the
header. There is only one alternative:
* The kernel goes into the **kernel** partition
* The 8265620 bytes squasfs system goes into the **rootfs** partition
* The remaining squasfs system goes into the **userdata** partition
So there is no need to analyze ddPack. We have the necessary entry
points for **fwupdate** or **firmwareupgrade.cgi** in the
**update.bin** script, and that's what we needed to know for the next
step:
#### Creating our own firmware updates
We do have shell access, so we can simply write the file systems we
want to flash as shown earlier. We don't need to use the D-Link
scripts. But where's the fun in that?
There is one challenge here: The D-Link tools are expecting signed and
encrypted firmware updates. They will run their verifyFirmware() and
decryptFirmware() functions, and fail the update if any of the returns
an error.
But bailing out on verification errors is only the default setting, as
illustrated by this code from **fwupdate** (there is code with similar
functionality in **firmwareupgrade.cgi**):
```sh
TrustLevel=`tdb get SecureFW _TrustLevel_byte`
verifyFirmware
ret=$?
case $ret in
2)
sign="not_signed"
;;
0)
sign="trust"
;;
*)
sign="untrust"
;;
esac
if [ "$do_up" = "1" -a "$ret" != "0" -a "$TrustLevel" = "1" ]; then
echo "3"
return 1
fi
```
So we don't need to sign the firmware if we change the **SecureFW
_TrustLevel** setting. Or we can even sign it with a key unknown to
the camera if we like. Which can be useful if we ever replace the
[**rootfs**]](#Partitions), since it will allow us to install our own verification
key and use it with D-Links tools.
But what about the encryption? This cannot be disabled. This gets
even better: The decrypting key so graciously provided to us in the
[**pib**](#Partitions) partition is an RSA private key. So not only can we decrypt
the firmware with it, but we can also encrypt! Nice.
The [**Makefile**](Makefile) in this repo has examples of how to use this to
create firmware update images which are accepted by the **fwupdate**
and **firmwareupgrade.cgi** tools. It uses an alternatative
[**update.bin**](update.sh) made to modify only the [**userdata**](#Partitions) partition. This
way we can install our own code in the camera, but still leave the
D-Link camera OS unmodified.
#### Bulding the example firmware update in this repo
Rebuilding the example is as easy as typing **make**. The Makefile is a
noisy one, so you can see all that's going on:
```
$ make
echo "WARNING: keys/DCS-8000LH-sign.pem is missing - using a new abitrary key instead"
WARNING: keys/DCS-8000LH-sign.pem is missing - using a new abitrary key instead
[ -f random-signkey.pem ] || openssl genrsa -out random-signkey.pem
Generating RSA private key, 2048 bit long modulus (2 primes)
...............................................................................................................................+++++
........................................................................................................................................................+++++
e is 65537 (0x010001)
openssl rsa -pubout -in random-signkey.pem -out verify.key
writing RSA key
echo "Publisher:DMdssdFW1" >certificate.info
echo "Supported Models:DCS-8000LH,DCS-8000LH" >>certificate.info
echo "Firmware Version:1.0.0" >>certificate.info
echo "Target:update.bin" >>certificate.info
echo "Build No:9999" >>certificate.info
echo "Contents:update" >>certificate.info
openssl rand 16 > aes.key
openssl rsautl -encrypt -in aes.key -inkey keys/DCS-8000LH-PriKey.pem -out aes.key.rsa
sed -ne 's/"//g' -e 's/^VERSION *= *//p' dcs8000lh-configure.py >version
mksquashfs version opt.local opt.squashfs -all-root -comp xz
Parallel mksquashfs: Using 4 processors
Creating 4.0 filesystem on opt.squashfs, block size 131072.
[===============================================================================================================================================================================================================|] 2/2 100%
Exportable Squashfs 4.0 filesystem, xz compressed, data block size 131072
compressed data, compressed metadata, compressed fragments, compressed xattrs
duplicates are removed
Filesystem size 1.08 Kbytes (0.00 Mbytes)
60.69% of uncompressed filesystem size (1.79 Kbytes)
Inode table size 98 bytes (0.10 Kbytes)
100.00% of uncompressed inode table size (98 bytes)
Directory table size 46 bytes (0.04 Kbytes)
100.00% of uncompressed directory table size (46 bytes)
Number of duplicate files found 0
Number of inodes 3
Number of files 2
Number of fragments 1
Number of symbolic links 0
Number of device nodes 0
Number of fifo nodes 0
Number of socket nodes 0
Number of directories 1
Number of ids (unique uids + gids) 1
Number of uids 1
root (0)
Number of gids 1
root (0)
openssl aes-128-cbc -md md5 -kfile aes.key -nosalt -e -out update.aes -in opt.squashfs
*** WARNING : deprecated key derivation used.
Using -iter or -pbkdf2 would be better.
*** WARNING : deprecated key derivation used.
Using -iter or -pbkdf2 would be better.
sed -e "s/@@MODEL@@/\"DCS-8000LH\"/" -e "s/@@MD5SUM@@/\"f1a1d3952c1630e5adb53e7f93b59d5e\"/" -e "s/@@VERSION@@/\"1.0.0-9999\"/" update.sh >update.bin
openssl aes-128-cbc -md md5 -kfile aes.key -nosalt -e -out update.bin.aes -in update.bin
*** WARNING : deprecated key derivation used.
Using -iter or -pbkdf2 would be better.
openssl dgst -sha1 update.aes | cut -d' ' -f2 > update.sha1
cat update.bin.aes aes.key.rsa certificate.info update.sha1 | openssl dgst -sha1 | cut -d' ' -f2 > sign.sha1
openssl rsautl -sign -inkey random-signkey.pem -out sign.sha1.rsa -in sign.sha1
tar cvf fw.tar certificate.info aes.key.rsa sign.sha1.rsa update.aes update.bin.aes verify.key
certificate.info
aes.key.rsa
sign.sha1.rsa
update.aes
update.bin.aes
verify.key
```
This will produce a new **fw.tar** firmware update image.
## Contact
Please contact me on bjorn@mork.no if you have questions, comments or
just want to say hi.
But please note that I won't be able to provide any support for this.
I am making this information available for educational purposes. If
you find it useful, then great! If you brick a camera, then I am
truly sorry about that. But there isn't much I can do about it....